A Practical Guide to Unit Testing Java Applications

Unit testing in Java isn’t just about checking a box. It’s the practice of testing the smallest, most isolated pieces of your code—think a single method or class—to make sure they do exactly what you expect. This becomes your first line of defense, letting you catch bugs early, refactor with confidence, and build quality in from the very beginning.
Why Unit Testing in Java Is a Game Changer
Let’s be real for a moment. Writing tests can feel like extra work, especially when you’re up against a tight deadline. But what if I told you it’s the single best thing you can do to build resilient, maintainable Java applications? This isn’t just about process; unit testing is a fundamental discipline that separates fragile code from truly robust, production-ready software.
The idea is straightforward: by proving each “unit” of your application works on its own, you build a solid foundation of trust. When a small, focused test passes, you’re pretty certain that one specific piece of logic is correct. And when it fails? You know exactly where to look, which saves you from those soul-crushing hours spent digging through complex call stacks.
Building a Safety Net for Your Code
I like to think of a good test suite as a safety net for my codebase. It gives the whole team the confidence to make changes and refactor without fear. Need to tweak a tricky algorithm or rename a core method? Without tests, you’re basically flying blind and hoping for the best. With a solid set of unit tests, you just run them after you’re done. If they all pass, you can be confident you haven’t accidentally broken something else.
This isn’t just a nice-to-have; it’s a huge strategic advantage. It lets your codebase grow and change over time without getting bogged down by technical debt. You can add new features faster, and new developers can jump in and contribute without worrying they’ll cause some hidden side effect. The test suite has their back.
More Than Just Bug Detection
Beyond just finding bugs, writing unit testing java code actually makes you a better designer. When you write a test, you’re forced to think about your code from the outside-in. Is this class easy to instantiate? Are its dependencies obvious? If you find a piece of code is a real pain to test, that’s usually a red flag for a design problem—maybe a class is trying to do too much or is too tangled up with its dependencies.
In essence, your unit tests are the very first user of your code. They give you instant feedback on its design and usability, pushing you to create more modular, decoupled, and maintainable components.
This is why unit testing is so critical. To really get why it’s such a game-changer, it helps to see where it fits into the bigger picture of Quality Assurance in Software Development. This whole practice really took off in the early 2000s, especially with JUnit, which completely changed how developers thought about code quality. Today, studies show that teams using these frameworks can slash their defect rates by up to 40%. In fact, automated tests often catch 70% more issues before deployment than manual testing ever could. You can discover more insights about these Java application testing trends.
Getting Your Java Testing Environment Ready
Before you can write your first unit test, you need a solid foundation. This means getting your project configured with the right tools. A smooth, repeatable setup is non-negotiable; it’s what separates a frustrating testing experience from a productive one.
We’re going to add two essential libraries to our project: JUnit 5, the go-to framework for writing tests in Java, and Mockito, a fantastic tool for creating mock objects. We’ll also make sure your IDE is ready to run these tests with a single click.
Getting this right from the start means you can focus on what matters—writing good tests—instead of wrestling with your build configuration.
Adding Dependencies with Maven and Gradle
Most Java projects today rely on a build tool like Maven or Gradle to handle libraries, or what we call dependencies. Adding JUnit and Mockito is just a matter of dropping a few lines into your project’s build file. The tool handles the rest, downloading and linking everything for you.
If your project uses Maven, you’ll want to open up your pom.xml file. The trick here is to add the dependencies with <scope>test</scope>. This little tag tells Maven that these libraries are only for testing, so they won’t get bundled into your final application. It keeps your production code lean.
Here’s what a standard setup looks like for JUnit 5 and Mockito in pom.xml:
<!-- JUnit 5 Engine to run tests -->
<dependency>
    <groupId>org.junit.jupiter</groupId>
    <artifactId>junit-jupiter-engine</artifactId>
    <version>5.10.2</version>
    <scope>test</scope>
</dependency>

<!-- Mockito for creating mock objects -->
<dependency>
    <groupId>org.mockito</groupId>
    <artifactId>mockito-core</artifactId>
    <version>5.11.0</version>
    <scope>test</scope>
</dependency>
For those of you on team Gradle, the idea is exactly the same, but the syntax is a bit different. You’ll be editing your build.gradle file and using the testImplementation configuration.
This is how you’d add the same libraries in a Gradle project:
dependencies { // JUnit 5 Jupiter API and Engine testImplementation ‘org.junit.jupiter:junit-jupiter-api:5.10.2’ testRuntimeOnly ‘org.junit.jupiter:junit-jupiter-engine:5.10.2’
// Mockito for creating mock objects
testImplementation 'org.mockito:mockito-core:5.11.0'
}
A Quick Look at Key JUnit Annotations
With the libraries in place, let’s talk about the bread and butter of writing a JUnit test: annotations. These are special markers (they start with an @ symbol) that you put on your methods to tell JUnit how to run them.
Think of annotations as instructions for the test runner. They define the structure and lifecycle of your tests, turning a plain Java method into a powerful verification tool.
You’ll be using these two annotations all the time:
@Test: This is the most important one. It flags a method as a test case. Without it, JUnit will just skip right over the method.@BeforeEach: This marks a setup method that runs before every single@Testmethod in the class. It’s perfect for getting things into a clean, predictable state, like creating a new instance of the class you’re testing.
By using these annotations, you automatically create a clean structure for your tests. All your setup logic is neatly tucked away, which makes your actual test methods much easier to read and understand.
Writing Your First Clean Java Unit Tests
Alright, you’ve got your environment set up. Now for the fun part: actually writing the code that tests your code. This is where the magic happens. We’re going to turn business logic into checks that prove our code is doing exactly what we think it’s doing. A great test is more than just a check; it’s a piece of documentation. It should be clean, readable, and tell you a story about a specific feature.
The secret to writing tests that don’t become a maintenance nightmare is a simple pattern called Arrange-Act-Assert (AAA). Seriously, this pattern is the gold standard for a reason. It forces you to structure your tests in a way that’s instantly understandable.
- Arrange: First, you set the stage. This is where you create your objects, mock any dependencies, and prepare the specific inputs for the scenario you’re testing.
- Act: Next, you do the thing. You call the one method you’re actually trying to test. Just one.
- Assert: Finally, you check the results. Did the method return what you expected? Did it change the state of an object correctly? This is where you verify the outcome.
Stick to this structure, and your tests will be a breeze to read. When something breaks months down the line, you’ll be able to see exactly what the test was trying to do, what it did, and where the expectation failed. It saves so much time.
A Practical Example with UserService
Let’s get our hands dirty. Imagine we have a UserService that’s in charge of creating new users. The rules are simple: the username can’t be null or empty, and every new user gets a unique ID.
Here’s the simple Java class we’ll be testing:
import java.util.UUID;
public class UserService { public User createUser(String username) { if (username == null || username.trim().isEmpty()) { throw new IllegalArgumentException(“Username cannot be null or empty”); } String userId = UUID.randomUUID().toString(); return new User(userId, username); } }
// A simple User data class class User { private final String id; private final String name;
public User(String id, String name) {
    this.id = id;
    this.name = name;
}
// getters...
}
Now, let’s write a test for the “happy path”—the case where everything works perfectly. We’ll use the AAA pattern to keep it clean.
import org.junit.jupiter.api.BeforeEach; import org.junit.jupiter.api.Test; import static org.junit.jupiter.api.Assertions.*;
class UserServiceTest {
private UserService userService;

@BeforeEach
void setUp() {
    userService = new UserService();
}

@Test
void shouldCreateUserSuccessfullyWithValidUsername() {
    // Arrange
    String validUsername = "testuser";

    // Act
    User createdUser = userService.createUser(validUsername);

    // Assert
    assertNotNull(createdUser);
    assertNotNull(createdUser.getId());
    assertEquals(validUsername, createdUser.getName());
}
}
See how readable that is? The test’s name tells you exactly what it’s for. It arranges the input, acts by calling the method, and then uses JUnit 5’s built-in assertion methods (assertNotNull and assertEquals) to prove the outcome is correct.
As you write more tests, you’ll rely on a core set of JUnit annotations and assertions. Here’s a quick reference table to keep the most common ones handy.
Essential JUnit 5 Annotations and Assertions
This table is a quick reference for the most commonly used JUnit 5 annotations and assertion methods for structuring and verifying tests.
| Element | Purpose | Example Usage |
|---|---|---|
| @Test | Marks a method as a test method. | @Test void myTestMethod() { ... } |
| @BeforeEach | Runs a method before each test method in the class. | @BeforeEach void setup() { ... } |
| @AfterEach | Runs a method after each test method in the class. | @AfterEach void teardown() { ... } |
| @BeforeAll | Runs a static method once before all tests in the class. | @BeforeAll static void init() { ... } |
| @AfterAll | Runs a static method once after all tests in the class. | @AfterAll static void cleanup() { ... } |
| assertEquals() | Asserts that two values are equal. | assertEquals(expected, actual); |
| assertNotNull() | Asserts that an object is not null. | assertNotNull(object); |
| assertTrue() | Asserts that a condition is true. | assertTrue(list.isEmpty()); |
| assertThrows() | Asserts that a specific exception is thrown. | assertThrows(Exception.class, () -> { ... }); |
Getting comfortable with these is the first step to becoming proficient with JUnit. They provide the fundamental building blocks for almost any unit test you’ll need to write.
Testing for Exceptions and Edge Cases
Great, our code works when given good data. But what about when things go wrong? A truly robust test suite makes sure your application handles errors gracefully. What happens if a null username is passed to our UserService? It should throw an IllegalArgumentException.
Let’s write a test for that using JUnit 5’s assertThrows method.
@Test void shouldThrowExceptionForNullUsername() { // Arrange String nullUsername = null;
// Act & Assert
assertThrows(IllegalArgumentException.class, () -> {
    userService.createUser(nullUsername);
});
}
This test is elegant and powerful. It only passes if the code inside the lambda throws the exact exception we specified. If it throws a different exception, or none at all, the test will fail, immediately telling you that your error-handling logic isn’t working as designed.
Testing both the sunny day scenarios and the stormy ones is what makes your code truly resilient. As you get deeper into this, you’ll find that testing often reveals opportunities to improve your code’s design. To learn more about that, check out these code refactoring techniques. It’s a natural next step after building a solid testing foundation.
Isolating Code with Mockito for True Unit Tests
A true unit test focuses on a single component, completely on its own. But what happens when your UserService needs to talk to a UserRepository? Suddenly, your test isn’t just about the UserService anymore; it’s also tangled up with the repository and whatever is behind it, like a database. This is a classic recipe for slow, brittle tests that blur the line into integration testing.
The answer is to isolate the code you’re testing from all its dependencies. That’s where mocking comes in. A mock is essentially a stand-in, a dummy version of a dependency that you control completely. Instead of letting your service call a real database, you give it a fake repository that returns exactly what you tell it to, every single time.
This technique is absolutely essential for effective unit testing in java. By swapping out real dependencies for these controlled substitutes, you guarantee your tests are lightning-fast, predictable, and focused only on the logic you actually want to test.
Introducing Mockito: The Go-To Mocking Framework
In the Java world, when you need to create mocks, Mockito is the library everyone reaches for. It gives you a clean, fluent API that makes it incredibly simple to create mock objects and dictate their behavior. With Mockito, you can simulate any scenario imaginable—from a successful database call to a dreaded network error.
Let’s build on our UserService example. Imagine it now depends on a UserRepository to check if a username is already taken before creating a new user.
public class UserService { private final UserRepository userRepository;
public UserService(UserRepository userRepository) {
    this.userRepository = userRepository;
}

public User createUser(String username) {
    if (username == null || username.trim().isEmpty()) {
        throw new IllegalArgumentException("Username cannot be null or empty");
    }
    if (userRepository.existsByUsername(username)) {
        throw new IllegalStateException("Username already taken");
    }
    // ... creation logic
}
}
To test this properly, we have zero interest in connecting to a real database. We’ll just mock the UserRepository instead.
Defining Mock Behavior with when().thenReturn()
The real magic of Mockito is its ability to “stub” method calls. The when().thenReturn() pattern is the bread and butter of the library. It’s a simple way of saying, “When this specific method is called on my mock with these exact arguments, I want you to return this specific value.”
Here’s how you could test the scenario where a username is already taken:
import static org.mockito.Mockito.*;
// In your test class… @Test void shouldThrowExceptionWhenUsernameExists() { // 1. Arrange - Set up the test UserRepository mockUserRepository = mock(UserRepository.class); UserService userService = new UserService(mockUserRepository); String existingUsername = “admin”;
// 2. Define the mock's behavior for this test case
when(mockUserRepository.existsByUsername(existingUsername)).thenReturn(true);

// 3. Act & Assert - Run the code and check the result
assertThrows(IllegalStateException.class, () -> {
    userService.createUser(existingUsername);
});
}
See what we did there? We created a mock UserRepository and told it to return true whenever existsByUsername("admin") is called. This simple setup lets us test the exception-throwing logic of our UserService without ever touching a database. It’s fast, clean, and totally isolated.
Mocking isn’t just about faking return values; it’s about setting the stage for your test. It lets you simulate specific conditions—like a database being full or an API call failing—that would be a huge pain to replicate with real dependencies.
This kind of isolation is a cornerstone of professional software development. Getting the distinction between test types right is crucial: unit tests check small components, integration tests check how they work together, and end-to-end tests check a full user journey. In fact, some reports show that automating tests at the unit level can catch 60-80% of defects early on, which is exactly when you want to find them.
Verifying Interactions with verify()
Sometimes, you don’t really care what a method returns (it might even be void), but you absolutely need to know that it was called. That’s where Mockito’s verify() method comes in. It lets you check if a method on your mock was invoked, and even with what arguments.
Let’s say our UserService is supposed to call a NotificationService after a user is successfully created.
// Inside a test for a successful user creation…
// Act userService.createUser(“newUser”);
// Assert - Verify the notification service was called correctly verify(mockNotificationService).sendWelcomeEmail(“newUser”);
This one line confirms that our UserService did its job and interacted with its dependency as expected. If the createUser method didn’t call sendWelcomeEmail, this test would fail, pointing you straight to the bug.
If you can master when() and verify(), you’ve got about 90% of what you’ll ever need from Mockito.
Advanced Strategies for Maintainable Java Tests
Think of your test suite as production code. It deserves the same level of care, design, and attention to detail that you pour into your main application. Once you’ve mastered the basics of Arrange-Act-Assert, the real challenge is building a test suite that’s clean, readable, and easy to maintain for the long haul.
Without that discipline, your tests can quickly morph from a safety net into a major source of technical debt. We’ve all seen it: brittle tests that shatter with minor refactoring, confusing test logic, and painfully slow execution times. These things kill trust and grind development to a halt. The goal is to write tests that are so clear and focused they become living documentation for your codebase.
The Power of Descriptive Naming and Single Responsibility
One of the simplest yet most effective changes you can make is how you name your tests. A test named testCreateUser tells me almost nothing. Does it test the happy path? An error case? A specific edge condition?
A better approach is to use a descriptive naming convention that spells out exactly what’s being tested and what you expect to happen.
shouldCreateUserSuccessfullyWhenUsernameIsValidshouldThrowIllegalArgumentExceptionWhenUsernameIsNullshouldReturnEmptyListWhenNoUsersExist
This instantly clarifies a test’s purpose before you even look at the code. It also naturally enforces the Single Responsibility Principle for your tests. Each test method should verify one, and only one, specific behavior. If you find yourself trying to check for both a valid user and an invalid one in the same test, that’s a red flag.
Common Anti-Patterns to Avoid
As you write more tests, it’s easy to fall into a few bad habits. Spotting and steering clear of these anti-patterns is key to keeping your test suite healthy and effective.
- Testing Private Methods: Your tests should focus on the public API of a class—its contract with the outside world—not its internal implementation. If you feel a strong urge to test a private method, it’s often a sign that the method is doing too much and should probably be extracted into its own class with a public interface.
- Adding Logic to Tests: Test methods should be dead simple and read like a script. Avoid
ifstatements, loops, or any complex logic. A complicated test often indicates that the test is trying to do too much or that the code it’s testing is overly complex itself. - Creating Brittle Tests: Tests that are too tightly coupled to the internal structure of a class are fragile. They break every time you refactor, even if the functionality is still correct. Focus on testing the behavior (the “what”), not the implementation details (the “how”).
A great test is resilient to refactoring. You should be able to completely change how a method works internally, and as long as its external behavior remains the same, the test should still pass.
To build truly robust and maintainable Java applications, it’s beneficial to explore various quality assurance testing methods that complement unit testing. The future of this space is also rapidly evolving. By 2026, AI is transforming Java unit testing from manual drudgery to an autonomous powerhouse. Tools are emerging that use reinforcement learning to write JUnit tests automatically, cutting creation time from over 30 minutes to mere seconds. These AI-optimized tests are projected to reduce maintenance by 60% by flagging risky changes and running only impacted tests for 40% faster pipelines. For developers using tools like Zest, AI can even reveal weak prompts that cause gaps in test coverage. You can read the full research about these software testing trends. For more specific guidance on this topic, check out our guide on https://meetzest.com/blog/unit-testing-best-practice to deepen your knowledge.
Automating Tests and Measuring What Matters
Writing great tests is a huge step, but it’s only half the battle. If you aren’t running them automatically and consistently, you’re leaving a ton of value on the table. This is where we connect the dots between writing unit tests and plugging them into a real-world development workflow. The ultimate goal is to make your test suite an automated quality gate that stands guard every time a single line of code changes.
This automation transforms testing from a manual, often-forgotten task into a seamless, reliable part of your delivery pipeline. It means every commit and every pull request gets validated on the spot, catching bugs instantly and giving developers immediate feedback. Without this, even the best tests are just well-intentioned suggestions. With it, they become the bedrock of your code quality.
Integrating Tests Into Your CI/CD Pipeline
Continuous Integration/Continuous Deployment (CI/CD) is all about automating how you build, test, and ship your code. Your unit tests are one of the very first things you should plug into this process. Getting this set up is surprisingly simple with modern tools like GitHub Actions, Jenkins, or GitLab CI.
Usually, you just need to configure a simple pipeline file (often written in YAML) that tells the CI server what to do. It checks out your code, builds it, and then runs the tests using the build tool you’re already familiar with. For a Maven project, the command is as simple as mvn test. For Gradle, it’s gradlew test. The magic happens when a test fails: the build fails, which stops buggy code from getting merged or deployed.
Think of an automated test suite in a CI pipeline as your project’s immune system. It’s always on, constantly monitoring for problems and stopping them before they can spread, keeping your main branch healthy and your production environment safe.
Measuring Code Coverage with JaCoCo
Once your tests are running on autopilot, the next question is obvious: “What are we actually testing?” This is where code coverage tools come in. They measure exactly which lines of your production code get executed when your tests run. JaCoCo (Java Code Coverage) is the go-to tool for this in the Java world; it’s free and integrates beautifully with Maven and Gradle.
JaCoCo generates easy-to-read reports that show you—often with handy color-coding—which parts of your code are covered and, more importantly, which aren’t. This isn’t just about numbers; it’s a treasure map for finding critical business logic that’s flying without a safety net. If you’re looking for more ways to button up your code quality, our guide on what is static code analysis is a great next step.
When you’re writing those tests, a simple three-step process can help ensure they are both effective and easy to live with down the road.
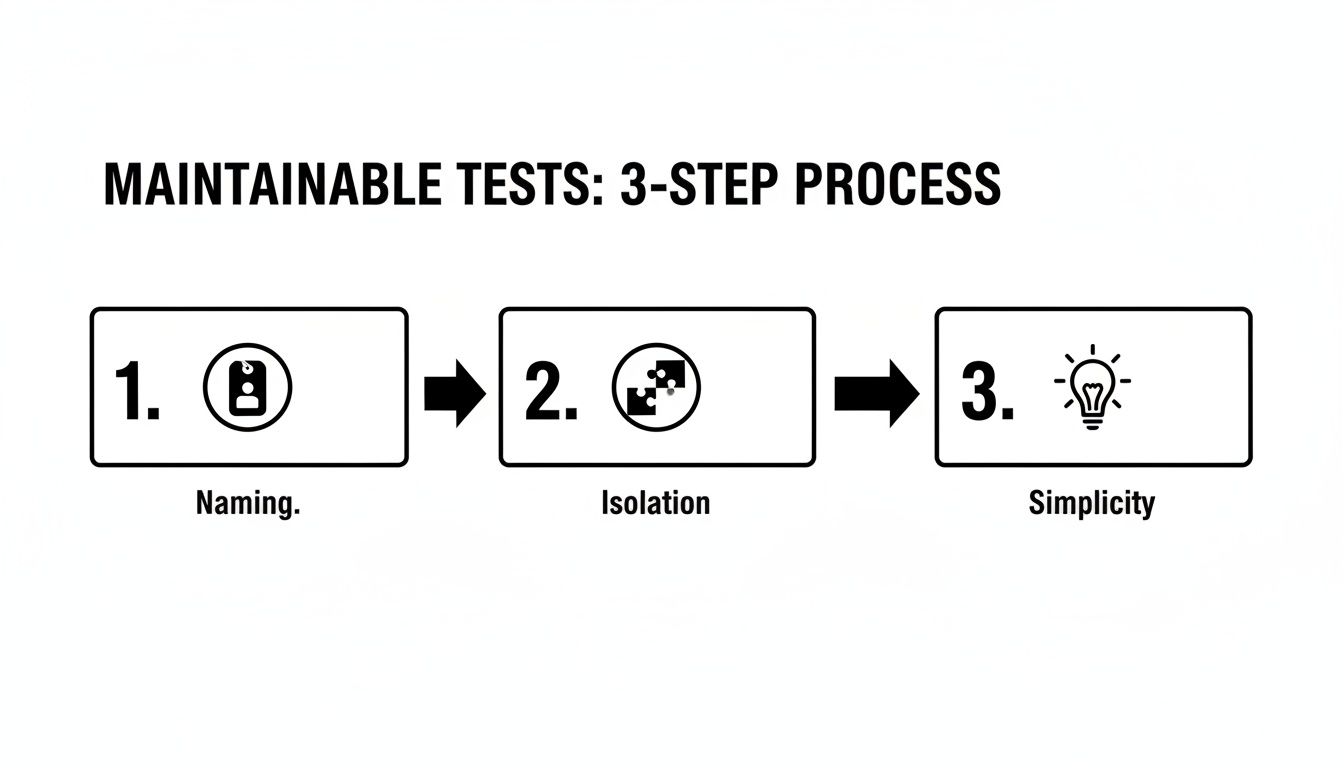
The big idea here is that maintainability boils down to clear naming, making sure each test is completely isolated, and keeping the test logic itself simple and focused.
One final word of warning: chasing 100% code coverage is almost always a mistake. It often leads teams to write brittle, low-value tests for trivial code just to make a number go up. A much healthier target is usually somewhere in the 70-85% range. The focus should be on covering your complex logic and critical business paths, not simple getters and setters. Use coverage reports as a guide to find untested areas that truly matter, not as a metric to be blindly pursued.
Common Questions We Get About Java Unit Testing
As you get your hands dirty with unit testing in Java, you’re bound to run into the same questions and roadblocks that have tripped up countless developers before you. Think of this as your cheat sheet for those common “hang on a minute…” moments.
Let’s clear up some of the most frequent points of confusion.
Key Distinctions in Testing
What’s the real difference between unit, integration, and end-to-end testing?
The short answer is scope. It’s all about how much of your application you’re testing at once.
- Unit tests are laser-focused. You’re just testing a single piece of the puzzle in isolation—one method, one class—making sure it does its one job correctly.
- Integration tests zoom out a bit. Here, you’re checking that two or more components play nicely together. A classic example is making sure your service layer can actually talk to your database repository.
- End-to-end tests cover a full user journey. They simulate a real user’s path through the application, from clicking a button in the UI all the way to a record being saved in the database and back again.
A great way to think about this is the classic “testing pyramid.” You want a wide base of fast, simple unit tests. Then, a smaller layer of integration tests, and finally, just a few comprehensive (and slow) end-to-end tests at the very top.
Goals and Best Practices
What’s a realistic code coverage target for my project?
Everyone wants a magic number, but there really isn’t one. Instead of obsessing over 100%, a much healthier and more practical goal for most teams is somewhere in the 70-85% range.
Honestly, chasing that last 15-20% often leads to writing brittle, low-value tests for simple getters and setters just to pump up the numbers. Use your coverage report as a map to find the dark corners of your codebase—the critical business logic or complex algorithms that really need test coverage. The goal is always meaningful tests, not just a high score.
Should I test private methods in my Java classes?
This one’s a classic. The general consensus and best practice is a firm no. You should not test private methods directly.
Think of it this way: your public methods are the contract your class has with the outside world. That’s what you need to guarantee works. Private methods are just the internal implementation details. If you test them directly, your tests become incredibly fragile. A simple internal refactor that doesn’t change the public behavior at all will suddenly break your test suite.
If you find yourself with a private method so complex that it feels like it needs its own tests, take that as a design cue. It’s often a sign that the method is doing too much and should be pulled out into its own separate class with a proper public interface. Then you can test it properly without breaking encapsulation.
What are the biggest mistakes people make when writing unit tests?
I’ve seen a few common traps that can completely sink the value of a test suite. Steer clear of these, and you’ll be in good shape.
- Tests that depend on each other. Every single test must be able to run on its own, in any order. If one test fails because another one didn’t run first, you’ve built a house of cards.
- Putting logic in your tests. A test should be dead simple: set up, execute, and assert. If you see
if/elsestatements or loops in your test code, it’s a huge red flag that something is too complex. - Forgetting to mock external dependencies. If your “unit” test is making a real network call or hitting a live database, it’s not a unit test anymore. It’s an integration test. Mocks are essential for keeping tests fast and isolated.
- Trying to test everything at once. Each test should have one, and only one, reason to fail. When a test with a name like
testUserCreationAndLoginAndProfileUpdate()breaks, you have no idea which part actually failed. Keep it focused.
Refine Your Java Testing Playbook
Build a safety net for your code that makes future changes less scary and your entire application more robust.
📊 Core Testing Metrics
- Code Coverage — Percentage of production code executed by your test suite.
- Defect Escape Rate — Number of bugs that slip past tests and reach production.
- Test Execution Time — Total time required for the CI pipeline to run all tests.
🕹️ My Cheatcodes
- 🌱 Arrange-Act-Assert (AAA) — Structure every test with this clear, three-step pattern for readability.
- 🦎 Mock Dependencies — Use tools like Mockito to isolate the class under test from external systems.
- ⚡ One Assertion Per Test — Focus each test method on verifying a single, specific behavior.
📈 Reflection Points
- 💡 Is my test's name descriptive enough to serve as documentation?
- 🧩 Am I testing the public contract (behavior) or fragile internal details (implementation)?
- 📘 Could a new developer understand this feature by reading only my tests?
✅ Pre-Commit Checklist
- 🔍 Run all unit tests locally
- 📊 Check coverage for new code
- 🧭 Ensure tests are independent and can run in any order
- 📈 Verify happy path, edge cases, and error conditions are tested
Gallery
Lemon shots