
A Guide to Jira and Git for Modern Development Teams

For any modern software team, connecting Jira and Git isn’t just a good idea—it’s become standard practice. By linking these two powerhouse tools, teams create a single source of truth that ties project tasks directly to the code being written. This creates incredible transparency and gives everyone, from project managers to developers, a real-time view of what’s happening.
Why Jira and Git Are a Development Powerhouse
Think of it like building a house. Jira is your master blueprint. It lays out every single task, from pouring the foundation to painting the walls. It tells you what needs to be done, who’s doing it, and when it’s due. Without that blueprint, you’d just have a bunch of people working on different things with no clear direction.
Now, imagine Git as the daily construction log. It’s a detailed record of every single change made to the house. Every nail hammered, every wire run—it’s all tracked, timestamped, and attributed to the person who did the work. It’s the complete history of how the house was built, piece by piece.
Separately, the blueprint and the log are both valuable. But the real magic happens when you connect them. When you can point to a task on the blueprint (a Jira issue) and immediately see the exact entry in the logbook where the work was done (a Git commit), you unlock a whole new level of clarity.
This connection is the heart of the Jira and Git integration. It forges an unbreakable link between the why of the work (the requirement in Jira) and the how of the work (the code in Git).

Creating a Single Source of Truth
Without this integration, developers are stuck manually updating Jira tickets after they push code. It’s tedious, easy to forget, and creates a disconnect that leads to all sorts of common frustrations:
- Project managers constantly bugging developers for status updates.
- Code reviewers staring at changes without any business context.
- QA testers unsure of what’s actually ready to be tested.
- Stakeholders looking at a Jira board that’s completely out of sync with reality.
Linking Jira and Git solves these problems. When a developer simply includes the Jira issue key in their branch name or commit message, the two systems talk to each other automatically. Suddenly, the Jira ticket is populated with links to the exact branches, commits, and pull requests related to that task.
This integration is even more crucial now that AI-assisted coding is becoming common. Tools like Zest give you visibility into how AI assistants are being used, but those insights are a hundred times more powerful when tied back to project goals. Knowing an AI tool saved 2 hours is interesting, but knowing it saved 2 hours on task PROJ-123 is actionable intelligence.
This complete audit trail—from the ticket in Jira to the code in Git—is no longer just a nice-to-have. It’s a must-have for building software efficiently and transparently.
Understanding the Core Building Blocks
To get Jira and Git working together, we first need to get comfortable with what each one does on its own. Think of them as two specialists on your team—one who plans the work and another who builds the product. Before they can collaborate effectively, you need to understand their individual roles and the language they use.
Let’s break down the essential concepts in both Jira and Git. Getting these fundamentals right is the key to building a seamless, connected workflow.
Jira: The Language of Work
At its core, Jira is all about organizing, tracking, and managing work. The single most important concept in Jira is the Issue. An issue isn’t just a “problem”—it’s any task, idea, or piece of work your team needs to handle.
While Jira offers many “issue types,” two are absolutely critical for development teams:
- Stories: These describe a feature from a user’s point of view. A story is a chunk of functionality that adds real value, like, “As a customer, I want to reset my password so I can log in if I forget it.”
- Bugs: A bug is exactly what it sounds like—a defect or problem in the product that needs fixing. For example, “The login button is broken on Safari.”
Choosing the right tools is a big deal, and picking from the best bug tracking software tools like Jira is a foundational step for any serious development team.
Git: The Language of Code
While Jira defines what needs to be done, Git records how it gets done. It’s the definitive history of every single change made to your codebase. Here are its fundamental pieces:
- Repository (Repo): This is your project’s home. It’s a folder that holds all your project files, plus the complete, detailed history of every change ever made to them. Think of it as the project’s official logbook.
- Branch: A branch is an independent line of development. When a developer starts working on a new Jira issue, they create a new branch. This gives them a safe, isolated space to make changes without messing with the stable, main version of the code.
- Commit: A commit is a single, saved snapshot of changes. Each commit gets a unique ID and a message explaining what was changed. It’s like a timestamped entry in that logbook, detailing a specific task that was completed.
- Pull Request (PR): When a developer is done with their work on a branch, they open a Pull Request. This is a formal way of saying, “Hey team, my code is ready. Can you please review it before we merge it into the main codebase?” It’s a crucial checkpoint for quality and collaboration.
Jira’s dominance in agile project management—holding around 40% market share—highlights just how important it is for modern developer workflows. Atlassian, Jira’s parent company, reported $4.4 billion in revenue for fiscal year 2024, serving over 300,000 customer organizations worldwide, a huge number of whom rely on integrating Jira with Git-based tools. You can learn more about Jira’s market impact and features.
Mapping Jira Actions to Git Commands
The real magic happens when you start connecting the dots between tasks in Jira and actions in Git. This creates a crystal-clear, traceable line from a business requirement all the way down to the exact code that delivered it.
Here’s a quick reference table to help you visualize that connection.
Mapping Jira Actions to Git Commands
| Jira Action | Corresponding Git Command/Concept | Purpose |
|---|---|---|
Create New Issue (e.g., PROJ-123) |
Create a New Branch (feature/PROJ-123-new-feature) |
Isolate work for a specific task and link it directly to the Jira ticket. |
| Start Work on an Issue | Make Commits (git commit -m "PROJ-123: Add login validation") |
Save incremental progress and create a detailed history of changes. |
| Move Issue to “In Review” | Open a Pull Request | Signal that the code is ready for peer review and discussion. |
| Close the Issue | Merge the Pull Request | Integrate the completed and approved code into the main codebase. |
This mapping is more than just a technical convenience; it’s a philosophy. It ensures that every line of code has a documented business purpose, creating an unbreakable audit trail that benefits everyone from developers to project managers.
Jira & Git Workflow Scorecard
Use this scorecard to solidify the connection between project management tasks and version control actions.
📊 Core Metrics
- Issue Traceability — Percentage of commits linked to a Jira issue.
- Branch Naming Consistency — Rate of branches following the `type/PROJ-ID-description` format.
- PR-to-Merge Time — Average time from Pull Request creation to merge, indicating review efficiency.
🕹️ My Cheatcodes
- 🌱 Issue as the Source — Every branch must originate from a specific Jira issue. No exceptions.
- 🦎 Commit with Context — Always include the Jira issue key in your commit messages for automatic linking.
- ⚡ PR Signals Progress — Opening a Pull Request should be the trigger to move a Jira ticket to the 'In Review' status.
✅ Before Starting Work
- 🔍 Confirm the Jira issue exists and is in the 'To Do' state.
- 分支 Create a new Git branch using the issue key.
- 🧭 Pull the latest changes from the main branch.
- 📈 Clarify the acceptance criteria in the Jira ticket.
How to Choose Your Integration Method
So, how do you actually connect Jira and Git? There isn’t a single “best” way—it all comes down to your team’s specific situation. Think about your team size, the tools you’re already using, your budget, and how much control you really need. Getting this right from the start saves a lot of headaches down the road.
Let’s break down the three main paths you can take.
Native DVCS Connectors
The most direct route is using the built-in connectors Atlassian provides. These are called DVCS (Distributed Version Control System) connectors, and they work right out of the box with the big players: GitHub Cloud, GitLab, and of course, Atlassian’s own Bitbucket. For many teams, this is the perfect starting point.
Think of this as the “plug-and-play” option. You essentially just authorize the connection between your Jira instance and your Git host, and they start communicating. It’s fast, free, and doesn’t require a technical guru to set up. This makes it a fantastic choice for smaller teams that just want to get going without a fuss.
But that simplicity has its trade-offs. These native connectors do the basics well—linking branches, commits, and pull requests to Jira issues—but that’s about it. If you need more advanced automation, use a self-hosted Git server, or work with a provider that isn’t one of the big three, you’ll quickly find this option a bit too limiting.
Specialized Marketplace Apps
If the native connectors feel too bare-bones for your needs, your next stop should be the Atlassian Marketplace. It’s packed with powerful apps from third-party developers designed to create a much deeper connection between Jira and a whole host of Git providers. These apps are great for teams using self-hosted Git servers like GitLab CE/EE or Bitbucket Server.
The real draw here is the expanded feature set. These apps go way beyond simple linking and can offer things like:
- Advanced automation: Automatically change an issue’s status when a pull request is merged.
- Enhanced reporting: Get detailed dashboards on developer productivity and code-level metrics.
- Deeper integration: See more comprehensive Git information right inside your Jira issues.
These apps usually come with a subscription fee, often based on your user count. They hit a sweet spot, giving you more power than the native options without the massive effort of building something from scratch. For a step-by-step walkthrough on connecting one of the most popular pairs, check out our guide on how to link GitHub with Jira.
Custom Solutions with Webhooks and APIs
For teams with truly unique workflows, strict security protocols, or the need to connect with proprietary tools, building a custom solution is the ultimate power move. This approach gives you maximum control and flexibility.
Here’s how it works: You use webhooks and APIs to create your own bridge. A webhook is just an automated notification sent from one system to another when something happens. For example, you could set up GitHub to send a webhook to a custom service whenever a pull request is created. That service can then use the Jira API to automatically add a comment to the related issue.
By building your own integration, you can dictate exactly how Jira and Git interact, tailoring the workflow precisely to your team’s processes.
While this path offers total control, it’s also the most demanding. It takes significant developer time to build and, just as importantly, to maintain over time. You’re on the hook for everything—API changes, security, and making sure it stays online. This option is really for large organizations or teams with very specific needs that no off-the-shelf tool can satisfy.
Jira-Git Integration Scorecard
Use this scorecard to evaluate and select the best integration method for your team’s unique workflow.
📊 Core Metrics
- Time to Implement — How quickly can your team get the integration running?
- Feature Depth — Does the solution offer advanced automation and reporting beyond basic linking?
- Maintenance Overhead — What is the ongoing effort required to keep the integration stable and secure?
🕹️ My Cheatcodes
- 🌱 Start Native — For teams on GitHub, GitLab, or Bitbucket, always begin with the free native connector.
- 🦎 Marketplace for More — When you need support for self-hosted servers or advanced features, explore Marketplace apps.
- ⚡ Custom as a Last Resort — Only build a custom solution if you have unique requirements that no existing tool can meet.
📈 Reflection Points
- 💡 Does our budget account for potential Marketplace app subscription fees?
- 🧩 Do we have the developer resources to build and maintain a custom API-based solution?
- 📘 Are our security and compliance needs met by a cloud-based connector, or do we need a self-hosted option?
Implementing a Bulletproof Jira and Git Workflow
Theory is one thing, but a battle-tested workflow is what truly separates organized teams from chaotic ones. This is where we bridge the gap between your project plans in Jira and your actual code in Git, creating a repeatable process that keeps everyone on the same page and your codebase pristine.
The secret ingredient? Consistency.
When you have a well-defined workflow, the integration becomes more than just a convenience—it transforms into a powerful engine for transparency and automation. It ensures every line of code has a clear purpose and can be traced directly back to a specific business need.
The version control market, where Git is king, is expected to grow from $1.48 billion in 2026 to a projected $5.89 billion by 2034. Combine that with Jira, and you’ve got a powerhouse for development teams. In fact, a recent Stack Overflow survey revealed that 94% of professional developers use Git, making this integration less of a “nice-to-have” and more of a “must-do.” For more data, you can check out the growth of version control systems on fortunebusinessinsights.com.
This flow diagram breaks down the three common paths for integrating Jira and Git, from built-in connectors to fully custom solutions.
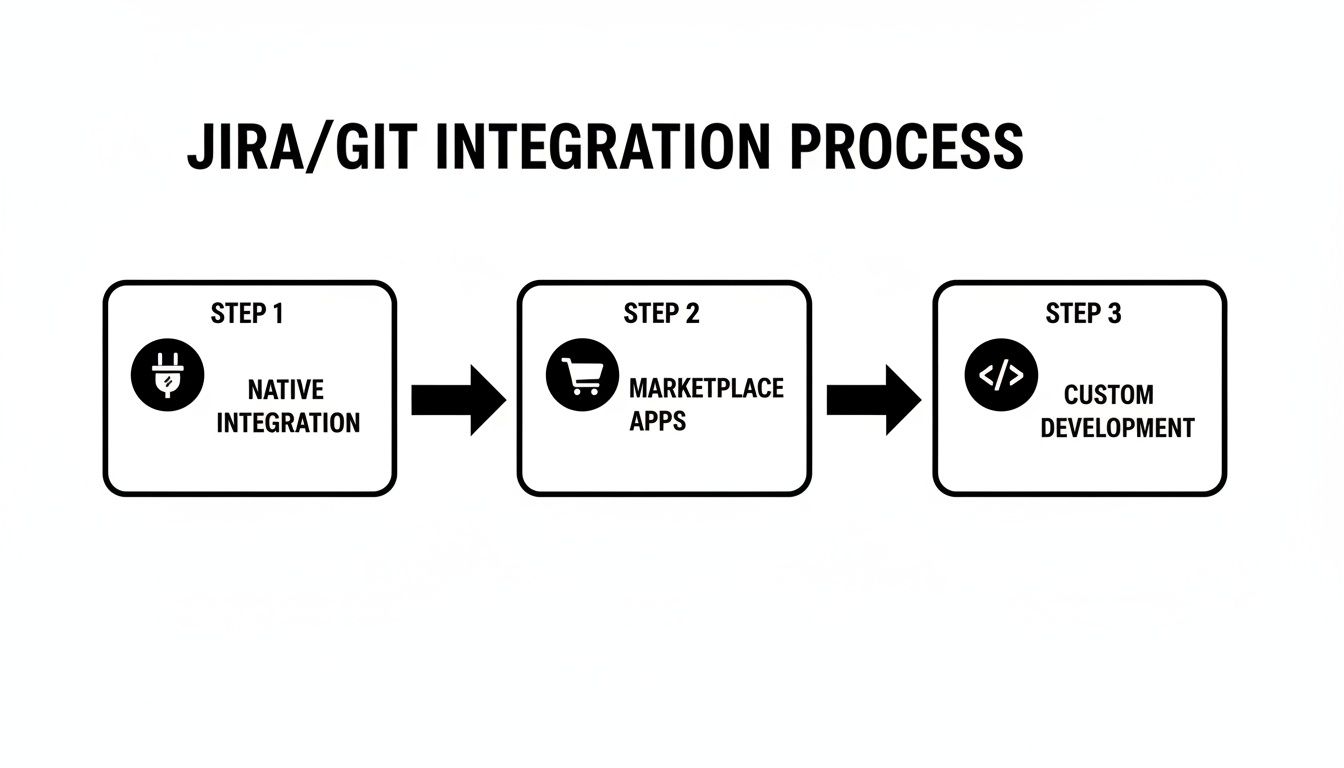
As you can see, teams can start simple with the tools already available and then scale up to more advanced solutions as their needs grow.
Establishing Your Branching Strategy
To make this connection really work, you need a clear and consistent branch naming convention. A simple yet highly effective approach is to adapt a streamlined version of Gitflow, where every branch is tied directly to a Jira issue. This small step provides immediate context to anyone looking at the repository.
Here’s a simple, effective template to follow:
type/PROJ-123-short-description
Let’s break that down:
- type: This tells you the kind of work being done. Common types include
feature,bugfix, orhotfix. - PROJ-123: This is the Jira Issue Key. It’s the unbreakable link between the code and the task.
- short-description: A few hyphenated words describing the task, making the branch’s purpose obvious at a glance (e.g.,
user-authentication).
Example Branch Names:
feature/PROJ-123-user-authenticationbugfix/APP-456-fix-login-button
This structure makes it incredibly easy to see which tasks are in progress just by looking at the active branches. To make your integration truly bulletproof, it’s essential to apply proven Git workflow best practices.
Writing Smart Commit Messages
Your commit messages are the next critical piece of the puzzle. By including the Jira issue key in your message, you can trigger “smart commits” that automatically update Jira without ever leaving your terminal. This is a massive time-saver and ensures your Jira board is always a true reflection of your progress.
The basic format is just PROJ-123 <message>, but you can also add special commands to change the issue’s status or even log time.
Here’s a template for a powerful commit message:
PROJ-123 #comment Added validation for the email field. #in-progress
In this example:
PROJ-123: Links the commit to the correct Jira issue.#comment ...: Adds the following text as a comment on the Jira issue.#in-progress: Moves the Jira issue to the “In Progress” column on your board.
This simple habit eliminates the constant context-switching back to Jira to update your ticket, keeping you in the flow. And if you ever need to tidy up your local workspace, our guide on how to https://meetzest.com/blog/delete-local-branch can be a lifesaver.
The Pull Request Lifecycle
The pull request (PR) is the final checkpoint where everything comes together. When you create a PR from a branch named feature/PROJ-123-user-authentication, the integration automatically links it to the PROJ-123 issue in Jira.
This brings the entire workflow full circle. Now, a project manager can open that Jira ticket and see:
- All branches related to the task.
- Every single commit made.
- The open pull request waiting for review.
This level of detail is a game-changer for collaboration. For teams using AI-assisted tools, this structured data is what allows platforms like Zest to deliver incredibly accurate metrics on developer productivity and the real impact of AI on specific tasks.
Putting Your Workflow on Autopilot with Automation
Having a solid Jira and Git workflow is a huge win, but the real magic happens when you automate the tedious bits. Manually updating statuses, copying and pasting info, and nudging teammates for code reviews—these are low-value tasks that pull developers out of their flow. This is where automation comes in, letting you create rules that tell the robots what to do.
By connecting Jira to your Git provider, you can set up powerful “if-this-then-that” recipes that trigger actions based on what your team is doing. This keeps your project board and your codebase in perfect sync, freeing everyone up to focus on what actually matters: solving problems and shipping great code.
The Tools of Automation
Your automation toolkit will really depend on your team’s tech stack, but most modern platforms offer great options for connecting the dots in your development pipeline.
-
Jira Automation: This is the built-in engine right inside Jira. It’s incredibly easy to use, with a simple drag-and-drop interface for building rules. It’s the perfect place to start for automating actions within Jira based on events happening in your Git repo.
-
GitHub Actions / GitLab CI/CD: These are powerful tools that live inside your Git provider. While they’re mainly used for continuous integration and deployment (CI/CD), you can easily configure them to talk to Jira’s API. This lets you trigger actions from Git, like adding a comment to a Jira ticket when a deployment goes wrong.
-
Webhooks: For more unique or complex needs, webhooks are your universal connector. Your Git provider can send a small packet of data (a webhook payload) to a specific URL whenever an event happens. You can then have a small service listen for these webhooks and perform just about any custom action you can dream up with the Jira API.
The Atlassian ecosystem, which pairs Jira with Git tools like Bitbucket, is a major player, serving over 300,000 organizations and bringing in $4.4 billion in revenue in fiscal year 2024. What’s really interesting is that teams using AI coding assistants are showing 5% faster growth in Jira seats. Atlassian now has 3.5 million AI monthly active users—a number that jumped 50% quarter-over-quarter. This shows just how critical automation is becoming for managers who need clear visibility into how these new tools are affecting their teams. You can read more about the enterprise software landscape on deviniti.com.
Real-World Automation Recipes
Okay, enough theory. Let’s look at some practical automation recipes you can set up today to get your Jira and Git workflow running smoothly on its own.
The goal of automation isn’t to add complexity; it’s to eliminate manual work and human error, creating a seamless flow of information between your code and your project plan.
Recipe 1: Auto-Transition Issue to ‘In Review’
This is one of the most common and useful automations out there. It makes sure that the moment code is ready for review, the Jira board reflects it instantly.
- Trigger: A Pull Request is created in your Git repository.
- Condition: The PR’s branch name includes a valid Jira issue key (like
PROJ-123). - Action: Move the linked Jira issue to the ‘In Review’ status.
This simple rule means developers don’t have to constantly jump back to Jira just to update a ticket, which helps them stay in the zone.
Recipe 2: Link Build and Deployment Status to Jira
You can give non-technical stakeholders full visibility into the development pipeline without them ever needing to leave Jira. This builds a ton of trust and cuts down on all those “is it live yet?” questions.
- Trigger: A GitHub Action or GitLab CI/CD pipeline finishes.
- Action: Add a comment to the related Jira issue with the build status, like “✅ Build Succeeded” or “❌ Deployment to Staging Failed.”
- Bonus: You can even include a direct link to the build logs for quick and easy debugging.
Recipe 3: Re-Open Ticket on Failed QA
Automation can also help enforce your team’s process. If a feature doesn’t pass its quality assurance check, you can automatically close the loop.
- Trigger: A comment containing a specific keyword (like “#failedQA”) is added to a Jira issue by someone on the QA team.
- Action: Change the issue’s status back to ‘In Progress’ and assign it back to the original developer.
This creates a clear, automated feedback loop that ensures nothing gets lost in the shuffle. It’s especially valuable as AI tools speed up development and increase the amount of code that needs to be reviewed and tested.
Measuring What Matters to Improve Performance
A great workflow is one you can actually measure and improve. Simply connecting Jira and Git is a fantastic start, but to really level up your team’s performance, you have to look beyond surface-level stats like ticket counts or the number of commits. The true power of this integration is its ability to unlock engineering metrics that show you what’s really going on with your team’s health and speed.
By linking tasks in Jira directly to the code being written in Git, you create a powerful stream of data. This is what lets you move past vanity metrics and focus on what truly drives continuous improvement. It helps you finally answer the critical questions about your development process.
Beyond Tickets to True Velocity
To really understand how your team is performing, we need to focus on metrics that track the flow of work from an idea all the way to delivery. With Jira and Git tightly connected, tracking these numbers becomes almost effortless.
The two most important metrics for any modern software team are Lead Time and Cycle Time.
- Lead Time: Think of this as the “customer-facing” metric. It measures the entire journey from the moment an idea is logged as a Jira ticket until it’s actually live for the customer. It’s the ultimate measure of how responsive your team is to the business.
- Cycle Time: This is a more focused, “developer-facing” metric. It tracks the time from when a developer first starts working on a task (the first commit) until that code is deployed to production. This shows your team’s internal efficiency and how quickly they can execute.
Tracking these two numbers tells you the real story behind your workflow. For instance, a long Lead Time but a short Cycle Time is a classic sign that work is sitting idle in the backlog for far too long before anyone even starts coding.
By focusing on the flow of value rather than just raw output, engineering leaders can shift from asking “How busy are we?” to “How effective are we at delivering results?”
Pinpointing Bottlenecks and Celebrating Efficiency
With all this integrated data, you can diagnose problems with incredible precision. A consistently high Cycle Time might point to a bottleneck in your code review process. A spike in Lead Time could signal issues with planning or prioritization. This is where the combination of Jira, Git, and modern analytics tools becomes a superpower.
For example, tools like Zest are built to consume this rich data stream and surface insights that would otherwise be invisible. They can automatically flag which branches are getting stuck in review or show you which types of tasks consistently take longer than estimated.
This allows managers to ask highly specific, meaningful questions:
- Are
bugfixbranches moving through the system faster thanfeaturebranches? - Is our pull request review time creeping up as the team gets bigger?
- Which developer on my team is a master of quick, effective refactoring?
This detailed view empowers leaders to pinpoint systemic bottlenecks, reward real efficiency, and guide their teams with specific, data-backed advice. If you want to go deeper on this, learning about DORA software metrics is a great next step, as they provide a solid framework for measuring high-performing teams.
The goal isn’t to micromanage—it’s to see the system clearly. When you measure what matters, you give your team the information they need to improve their own processes. That’s how you build a culture of continuous, data-driven improvement.
Got a Problem? Common Jira & Git Questions Answered
Even in the most well-oiled teams, the Jira and Git workflow can hit a snag. When you’re in the middle of a sprint, the last thing you need is a technical roadblock. You just need a fast, practical answer.
This section is all about straightforward solutions to the most frequent questions teams ask when trying to get these two powerful tools to play nicely together. My goal is to give you quick, actionable advice to get your team back on track without losing momentum.
How Should We Handle Urgent Hotfixes?
Urgent bugs can’t wait for the next release cycle. They need a special, fast-tracked process that bypasses your standard feature workflow, but without sacrificing traceability. The key is to isolate the fix while making sure it’s fully documented in Jira.
Here’s how we’ve always handled it:
- Create a Dedicated Hotfix Issue: First things first, log a new bug in Jira (e.g.,
PROD-789). Give it the highest priority. This makes the work visible to everyone and gets the clock ticking. - Branch from Main: This is the most important step. Unlike features that branch from
develop, hotfixes must branch directly from your main production branch (e.g.,mainormaster). A clear name likehotfix/PROD-789-critical-login-fixis perfect. - Develop and Commit: As you write the fix, use smart commits to link your work back to the Jira issue. Something like
PROD-789 #comment Fixing the login bugkeeps everyone in the loop. - Merge and Tag: Once the fix is reviewed and approved, merge the hotfix branch back into both
mainand yourdevelopbranch. This is critical—if you forget to merge intodevelop, your fix will be overwritten by the next regular release. Finally, tag themainbranch with a new version number.
Can a Single Commit Link to Multiple Jira Issues?
Yes, absolutely. This happens all the time, especially when a single piece of work tackles both a new feature and a related bug. To link one commit to multiple Jira issues, just list each issue key in your commit message.
Example Commit Message:
PROJ-123 APP-456 #comment Refactor user service for new API and fix related caching bug.
That one commit will now pop up in the development panel for both the PROJ-123 and APP-456 issues in Jira. It’s a simple way to maintain complete visibility.
How Can We Enforce Naming Rules?
Consistent branch and commit names are the backbone of a clean Jira and Git integration, but relying on people to remember the rules is a recipe for failure. The only sustainable solution is automation.
- Pre-commit Hooks: Use a tool like Husky to run a tiny script that checks the commit message format before the commit is even created. If the message doesn’t have a valid Jira issue key, the commit fails, and the developer knows instantly.
- CI/CD Pipeline Checks: Add a validation step to your CI pipeline (in GitHub Actions, GitLab CI, etc.). If a branch name doesn’t follow your convention (like
feature/PROJ-123-description), the build fails early. This forces the developer to fix it right away.
Why Isn’t My Git Data Showing Up in Jira?
This is the classic headache. Your team is doing everything right, but the commits and branches just aren’t appearing in Jira’s development panel. Before you pull your hair out, run through this quick troubleshooting checklist.
- Check App Permissions: Is the DVCS connector or Marketplace app properly authorized in GitHub, GitLab, or Bitbucket? It needs permission to actually read your repository’s contents.
- Verify Project Keys: A simple typo is the most common culprit. Double-check that the Jira project key in your commit messages (
PROJ-123) is an exact match for the key in Jira. - Resync the Integration: Go into Jira’s administration settings for your Git integration. There’s almost always a “Resync” or “Re-index” button. Clicking this forces Jira to pull fresh data from your repositories and often fixes syncing problems.
Master Your Jira & Git Workflow
Use this guide's principles to build a transparent, automated, and data-driven development process.
📊 Core Metrics
- Cycle Time — Total time from first commit to deployment, measuring team efficiency.
- Issue Traceability — Percentage of commits linked to a Jira issue, ensuring context.
- Sync Latency — Delay for Git actions (commits, PRs) to appear in Jira.
🕹️ My Cheatcodes
- 🌱 Branch from Issue — Every new branch must start from a Jira issue key (e.g., `feature/PROJ-123-task`).
- 🦎 Commit with Context — Always include the Jira key in commit messages for automatic linking.
- ⚡ Automate Transitions — Use CI/CD or Jira Automation to update issue status on PR creation or merge.
✅ Troubleshooting Checklist
- 🔍 Verify Git app permissions in Jira settings.
- 📝 Check for typos in Jira project keys in commits.
- 🔄 Force a manual resync via the DVCS admin panel.
- 🔑 Confirm your Git account is linked in your Jira profile.
Gallery
Lemon shots



