
How to Use Cursor with Figma GitHub MCP Integration: Quick Setup and Tips

Quick Overview Of Cursor, Figma, And GitHub Integration
Connecting Cursor with a local MCP server lets you pull component metadata and code stubs straight into your editor. Teams often see 20% faster UI shipping, backed by 100k+ downloads each month.
This setup bypasses tedious manual exports. Instead, your design and code remain in sync, so everyone stays on the same page from day one.
Integration Step Summary
To keep things clear, here’s a high-level view of each tool, the action you’ll take, and what you’ll get in return.
| Tool | Action | Outcome |
|---|---|---|
| MCP Server | Start locally | Exposes metadata |
| Figma | Authorize | Feeds in design schemas |
| GitHub | Configure | Syncs code stubs |
This table maps out the core moves at a glance, helping your team glide from mockup to code without detours.
Real-World Spotlight: Framelink’s Figma-MCP Bridge
The Framelink/figma-developer-mcp project proves this integration in action. It’s already hit 100k+ downloads, earned 11.1k stars, and seen 890 forks. Check out the figma-developer-mcp on GitHub to see their setup in practice.
Connecting The Dots In Your Workflow
- Fire up your local MCP server to expose component schemas.
- Grant Figma API access so metadata flows in seamlessly.
- Set up your GitHub repository with the right tokens for code synchronization.
- Activate the Cursor extension in your IDE to scaffold components instantly.
For a deeper dive into every Cursor feature and best practices, head over to Use Cursor effectively now.
Prerequisites For Integration
Integrating Cursor with Figma and GitHub through MCP starts with a few essentials.
You’ll need both sides prepped:
- Figma account with organization-level plugin rights
- GitHub repository reserved for design tokens and generated components
- Figma API token to grant MCP access to file metadata
- GitHub personal access token scoped for read/write
On your workstation, set up the environment:
- Node.js (https://nodejs.org) or Docker (https://www.docker.com) to host the MCP server
- Cursor extension in your IDE for live design context and code scaffolding
Tip: Store your secrets in a .env file and validate permissions right away. This simple habit can save you from 403 errors during your initial tests.
Before you fire up the integration, confirm that your repo’s default branch exists and that your token user has admin privileges.
Configuring Figma MCP Server
Bringing your local MCP to life starts with cloning the figma-developer-mcp repo and installing all dependencies. Then, drop your Figma API token into the .env file to keep things secure.
Next up is network setup. Add https://localhost:3845 to Figma’s allowlist and forward port 3845. Since you’re running HTTPS locally, generating a trusted SSL certificate prevents those annoying browser warnings.
Handling HTTPS And Firewall Quirks
Dealing with certificates and firewall rules can be a bit finicky. We rely on mkcert to create local, trusted SSL certs—just run it with the --install flag. If errors pop up, regenerate your certificates and confirm that 127.0.0.1 is on your allowlist.
Quick Checklist:
- Use mkcert to auto-install root CAs
- Verify
127.0.0.1in Figma’s allowed origins - Restart the MCP server after cert updates
Publishing And Pulling Schemas
Head into Figma’s Code Connect UI within your design file and hit Publish on any updated component schemas. From that point on, Cursor can automatically fetch structured metadata—no manual exports needed.
This dashboard shows active schemas and whitelisted origins at a glance, making it easy to verify server health and metadata exposure. In our experience, running MCP locally trims UI implementation time by single-digit percentages while keeping designs pixel-perfect.
For a deep dive into how Figma’s 2025 schema changes can enhance your workflow, check out the full research on Figma Schema 2025 Updates.
Setting Up GitHub Authentication
To connect Cursor with Figma through the GitHub MCP integration, your first step is a GitHub personal access token. Limit it to repo and workflow scopes to avoid giving excess privileges.
Next, slip that token into your MCP configuration via an environment variable. This keeps secrets out of your code and makes updates smoother down the line.
Setting Up Actions Workflow
- Configure health checks to ping your MCP endpoint on every push
- Fail builds when Figma metadata sync breaks
- Auto commit design updates after checks pass
Make sure to rotate tokens regularly and enforce an allowlist for your MCP servers. Also, lock down your CI/CD pipeline by restricting secrets to GitHub Actions and keeping a close eye on audit logs.
Tip Rotate tokens every 90 days and audit access logs to catch any unexpected activity.
Integrating Cursor With MCP And GitHub
First, point Cursor at your local MCP endpoint. In most setups that means entering http://localhost:3845 so it can pull live design metadata from Figma.
Enabling The GitHub Plugin
Next, flip on Cursor’s GitHub plugin. This little switch lets you commit generated components and design tokens automatically whenever you sync. It’s a huge time-saver.
Scaffolding With Inline Prompts
Whenever you need a React scaffold or a design schema, drop an inline comment. For example:
// fetch schema Button
Cursor reads that, grabs your tokens, and spins up the boilerplate you need.
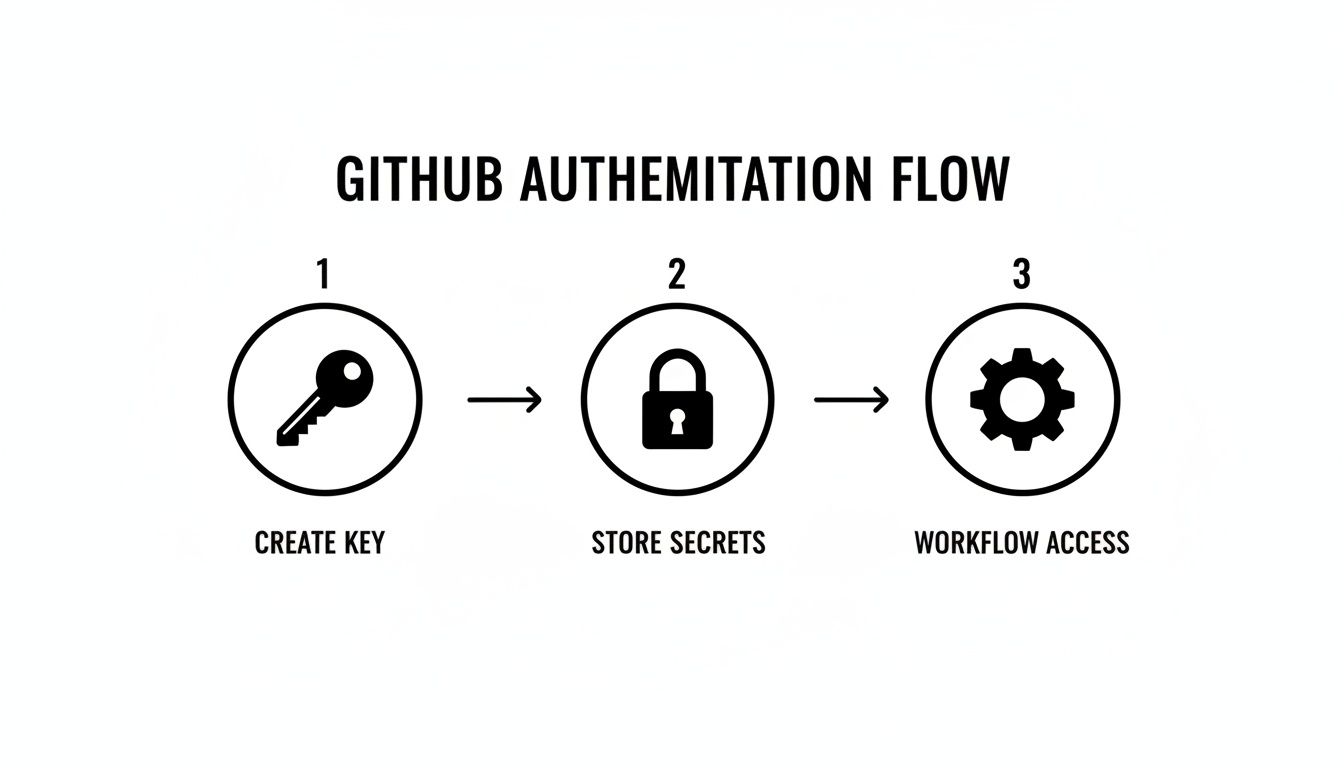
The graphic breaks down the GitHub Auth flow into three clear phases:
- Generate your SSH key or personal access token
- Securely store it in your repo or CI secrets
- Let the workflow kick off automated commits
From there, map Figma frame names to file paths, tweak your templates with live tokens, and use merge helpers when conflicts pop up. Before you know it, your design-to-code loop feels frictionless.
Example Workflows And Real World Scenarios
Imagine a designer fine-tuning a button style in Figma. Within seconds, MCP pushes fresh metadata to Cursor. The React component regenerates automatically with updated props—no manual edits required.
Now switch to a cross-functional sprint. Designers merge their Figma updates into GitHub. A GitHub Actions workflow kicks off, triggering MCP’s code generation. Developers then review a pull request inside Cursor, complete with inline design previews that keep everyone on the same page.
Key Benefits
- Reduced Handoff Friction by automating style syncing
- Consistent UI Components powered by live design metadata
- Audit Trails capturing every design tweak and code change
These real-world scenarios demonstrate how teams use Cursor, Figma, GitHub, and MCP in production. To clean up stale branches without a headache, see our guide on Git branch deletion.
Teams cut handoff friction by 50%.
Troubleshooting And Best Practices
Integrating Cursor with Figma and GitHub through MCP can stumble when tokens expire or get revoked. When authentication failures pop up, double-check your API credentials and restart your terminal session to clear out any cached secrets.
Sometimes the MCP server simply times out under load. In those cases, bumping up your retry counts or adjusting local rate-limit settings usually does the trick, turning repeated timeouts into smooth, successful calls.
Diagnose Errors
- HTTP 401: Indicates stale or invalid tokens; refresh and reload your environment.
- Error Code -32001: Signifies an MCP timeout—trace the timestamps in your logs.
- Missing Schemas: Caused by mismatched component IDs, leading to incomplete code stubs.
Framelink’s MCP server was vulnerable to CVE-2025-53967 (CVSS 7.5) until the fix rolled out in v0.6.3 as of September 2025. For all the details, see Remote Code Execution in Framelink’s MCP Server.
Explore our Cursor developer productivity guide.
Keep your integrations secure by enforcing allowlist policies and rotating tokens on a regular schedule. Monitor your logs closely so you can catch issues before they impact your team.
Boost your workflow with Zest at https://meetzest.com
Level Up Your Cursor-Figma-GitHub MCP Workflow
Optimize your design-to-code process with seamless Cursor and Figma GitHub integration.
📊 Key Metrics
- UI Speed — 20% faster cycles
- MCP Downloads — 100k+ monthly
- Handoff Friction — 50% cut
🕹️ Cheatcodes
- 🔧 Local MCP Setup — clone & configure .env
- 💬 Inline Prompts — scaffold via comments
- 🔄 GitHub Plugin — auto-commit design tokens
✅ Before Shipping
- 🔍 Validate tokens & .env
- 📊 Confirm allowlist & SSL
- 🛠️ Run CI health checks
Gallery
Lemon shots



