
A Developer's Guide to GitHub Pull and Merge Workflows
If you’re working on a development team, your daily rhythm is probably built around pulling down changes and merging in new code. At its heart, the entire GitHub pull and merge process is what keeps everyone’s work in sync.
A pull is how you get the latest updates from the remote repository onto your local machine. A merge is how you take those changes—or your own—and weave them into another branch. Getting comfortable with these two concepts is non-negotiable for smooth collaboration.
The Core of Collaboration GitHub Pull and Merge Explained
When you run git pull, it feels like a single action, but it’s actually a one-two punch. What you’re really doing is running two separate commands: git fetch and then git merge. Knowing this is the key to having more control over your workflow.
Here’s what’s happening under the hood:
-
git fetch: This command reaches out to the remote repository and downloads all the new stuff—commits, files, and branches. Crucially, it doesn’t touch your local working code. It’s like checking for mail but leaving it in the mailbox for you to review first. -
git merge: Once the new data is fetched, this is the command that integrates those changes into the branch you’re currently on. This is where the remote work and your local work finally shake hands.
By running git fetch on its own, you give yourself a chance to see what changes are coming down the pipeline before you commit to merging them. This simple habit can save you from a world of headache-inducing merge conflicts.
Pull Command vs Pull Request Workflow
So, while git pull is a command you run locally to sync up, a Pull Request (or PR) is a completely different beast. It’s a formal process that happens on the GitHub platform itself, designed for collaboration. Both end with a merge, but how you get there is what matters.
These workflows are all built on the same foundation, which is why a good grasp of Git for version control is so important.
A Pull Request is more than just a merge; it’s a conversation. It’s where code review, automated checks, and team discussions happen before any changes are integrated into the main codebase.
Knowing when to use a direct git pull versus opening a Pull Request is a sign of an experienced developer. To make it simple, here’s a quick breakdown of when to use each.
Pull Command vs Pull Request Workflow
This table compares the direct git pull command with the more formal Pull Request workflow, helping you decide which to use for your current task.
| Workflow | Primary Use Case | Best For | Key Benefit |
|---|---|---|---|
git pull |
Synchronizing your local branch with its remote counterpart. | Solo developers or updating your personal fork. | Speed. Quickly gets your local environment up-to-date. |
| Pull Request | Proposing changes to a shared branch for review. | Team-based development and open-source contributions. | Collaboration. Enables code review, discussion, and quality checks. |
Ultimately, your choice depends on the situation. Just need to get the latest main branch updates on your machine? A quick git pull is your best friend. Ready to get your brilliant new feature into the team’s shared develop branch? A Pull Request is the only professional way to do it.
Keeping Your Local Repository in Sync
We all love a quick git pull, but it’s a bit of a black box. It yanks down changes from the remote and immediately tries to merge them into your work, all in one go. This can get messy fast, sometimes creating confusing merge commits or dropping you right into a conflict you weren’t ready for.
For a calmer, more predictable workflow, I always recommend splitting this up. It gives you a crucial moment to see what’s coming before it gets tangled up with your local code.
Fetch First, Then Merge
My go-to method for staying in sync is a simple, two-step dance. It gives me complete control and prevents surprises.
First, I run git fetch origin. This command downloads all the new commits, branches, and tags from the remote repository (which we call origin). The key here is that it doesn’t touch your local branch. Your main branch is exactly as you left it. All the new stuff is safely stored in a remote-tracking branch, like origin/main.
Now you can peek at what’s new. A quick git log main..origin/main will show you a list of all the commits that exist on the remote but not on your local branch. It’s a great way to see who changed what before you decide to integrate.
Once you’ve had a look and you’re ready to update your local branch, you have two main choices:
git merge origin/main: This is the classic approach. It takes all the new commits fromorigin/mainand creates a new “merge commit” to tie the two histories together. It’s safe and preserves the exact history of every branch.git rebase origin/main: This is my personal preference for keeping history clean. It takes your local commits, temporarily sets them aside, fast-forwards your branch to matchorigin/main, and then replays your commits one by one on top. The result is a clean, linear history.
By separating fetch from merge, you’re turning a blind, automated command into a deliberate, informed decision. This one habit has saved me more headaches from messy merges than I can count.
The Power of Pull with Rebase
If you like the convenience of a single command but want that clean, linear history, git pull --rebase is your best friend.
Instead of creating a merge commit like a standard git pull, this command fetches the new changes and automatically rebases your local work on top. You avoid the “Merge branch ‘main’ of…” commits that clutter up your log, making it much easier to read and understand the project’s progression.
Making Rebase the Default
If you find yourself constantly typing --rebase, you can tell Git to make it the default behavior for git pull.
Just run this command once, and you’re set:
git config --global pull.rebase true
This simple config change ensures that every git pull you run from now on will help maintain a clean and linear project history. And remember, once a feature branch has been merged, it’s good practice to clean up. If you need a refresher, check out our guide on how to delete a local Git branch safely.
Master Your GitHub Workflow
Turning every code integration into a smooth, conflict-free process that accelerates your team’s delivery.
📊 Core Metrics to Track
- Time to Merge — The average time a pull request stays open. Shorter is better; it means your review process is quick and efficient.
- Merge Conflict Rate — How often do PRs run into conflicts? A high rate is a red flag for teams not syncing their branches often enough.
- Review Time — How long does a PR sit waiting for its first review? This is a huge bottleneck indicator.
🕹️ My Cheatcodes
- 🌱 Fetch Before You Pull — I can’t say it enough: always run
git fetchto see what’s coming before you merge it into your local branch. No surprises. - 🦎 Choose the Right Merge — On GitHub, use ‘Squash and Merge’ for small feature branches to keep the
mainbranch history clean. For bigger integrations where the individual commits tell a story, stick with a ‘Merge Commit’. - ⚡ Clear PR Descriptions — A great pull request is a gift to your team. Add context, screenshots, and steps for testing. It makes the review process faster and more effective for everyone.
📈 Reflection Points
- 💡 Am I syncing with the
mainbranch frequently to keep my feature branch from diverging too far? Small, frequent integrations are always better than one massive, painful merge. - 🧩 Did I choose the merge strategy that actually fits our team’s needs? Don’t just click the green button; think about what kind of history you want to create.
- 📘 Could this pull request be smaller? Breaking large features into a series of smaller, more focused PRs makes them dramatically easier—and faster—to review.
✅ Before Merging Your PR
- 🔍 Pull the latest changes from the base branch (like
main) into your feature branch and resolve any conflicts locally first. Don’t leave it for the person who merges. - 📊 Make sure all automated checks and CI tests are green. A red check is a hard stop.
- 🧭 Double-check that your PR title and description are clear. The title often becomes part of the commit message, so make it count.
- 📈 Confirm you’ve gotten the thumbs-up from all required reviewers.
Mastering the Collaborative Pull Request Process
So far, we’ve focused on commands like git pull and git merge which are all about managing your local work. But where the real magic of team development happens is with the Pull Request (PR) on platforms like GitHub.
A PR is so much more than a request to merge code. It’s the start of a conversation. It’s where your work gets reviewed, discussed, and improved by your teammates before it ever has a chance to impact the main codebase.
When you push your branch and open a PR, you’re essentially putting your code up for inspection. This is your team’s most important safety net for catching bugs and design flaws early. It also doubles as an amazing knowledge-sharing tool, where reviewers can offer fresh perspectives and help everyone on the team grow.
Crafting the Perfect Pull Request
I can’t tell you how many times I’ve seen a PR stall for days just because the reviewer had no idea what it was supposed to do. The quality of your PR has a direct and immediate impact on how quickly it gets reviewed and merged. A vague title and an empty description create friction; a well-crafted PR greases the wheels.
To get your code approved faster, make your PR description as helpful as possible:
- A Clear Title: Don’t just write “Fix bug.” Be specific: “Fix user login failure on invalid password.”
- The “Why”: Give some context. What problem does this solve? Is there a ticket or issue number you can link to?
- The “How”: Briefly explain your technical approach. Did you refactor a class, add a new API endpoint, or tweak a UI component?
- Testing Steps: This is non-negotiable. Tell the reviewer exactly how to test your changes and verify the fix.
Think of your PR description as the “README” for your changes. The more context you provide upfront, the less back-and-forth you’ll have with reviewers, leading to a much faster github pull and merge cycle for your feature.
Keeping Your PR’s Commit History Clean
Nothing makes a reviewer’s eyes glaze over faster than a PR with a dozen commits like “fix typo,” “WIP,” and “addressing comments.” A messy history is hard to follow and makes for an even messier project history later on. Before you request a review, it’s a great habit to clean up your commits into logical, distinct steps.
This is where an interactive rebase (git rebase -i) becomes your best friend. It’s a powerful tool that lets you:
- Squash: Combine several small, related commits into one comprehensive commit.
- Reword: Rewrite your commit messages for better clarity and context.
- Reorder: Rearrange commits to tell a more logical story of how you built the feature.
A PR with a clean, well-documented commit history is a joy to review. It allows your teammates to follow your thought process and understand the changes on a deeper level. For a deeper dive on this, check out our guide on effective code review good practices.
Choosing the Right Merge Option on GitHub
Once your PR gets the green light, you have one final decision: how to merge it. GitHub offers 3 main options, and your choice will shape your project’s Git history.
- Merge Commit: This is the default behavior. It takes all the commits from your branch and plops them onto the
mainbranch, creating a new “merge commit” to tie the histories together. This preserves every single commit, for better or worse. - Squash and Merge: This is my personal favorite for most features. It squashes all of your PR’s commits into a single, clean commit on the
mainbranch. This keeps the main history tidy and easy to read. - Rebase and Merge: This option takes your commits and adds them one-by-one onto the
mainbranch without a merge commit. It creates the most linear, pristine history, but can cause confusion if your team isn’t used to it.
For most teams I’ve worked with, Squash and Merge offers the perfect balance. It keeps the main branch history clean while preserving the detailed commit-by-commit conversation within the context of the PR itself.
My GitHub Workflow Cheat Sheet
Turn every code integration into a smooth, conflict-free process that helps your team move faster.
| Category | Advice & Reflection |
|---|---|
| 📊 Core Metrics | Time to Merge: How long from PR open to merge? Merge Conflict Rate: How often do we hit conflicts? Review Time: How long does a PR wait for its first review? |
| 🕹️ My Go-To Moves | Fetch, Then Pull: Always run git fetch to see what’s coming before you git pull.Choose Wisely: Use ‘Squash and Merge’ for features, ‘Merge Commit’ for major integrations. Write Good PRs: A clear description with testing steps is the fastest way to get a merge. |
| 📈 Quick Gut-Checks | Is my branch synced with main to avoid a massive, painful merge?Did I pick the merge strategy that our team agreed on? Could I have split this into smaller, easier-to-review PRs? |
| ✅ Pre-Merge Checklist | Pull the latest from the base branch and fix any conflicts locally. Make sure all automated checks (CI tests) are green. Confirm your PR title and description are clear and helpful. Verify you have all the required approvals from your reviewers. |
Navigating and Resolving Merge Conflicts
It’s a rite of passage for every developer: the dreaded merge conflict. The first time you see one, it feels like you broke something, but it’s actually a completely normal part of working on a team. It’s just Git’s way of saying, “Hey, I need a human’s opinion here.”
Conflicts pop up when you and a teammate have edited the exact same lines of code in different ways. Git can’t decide which version is correct, so it pauses the merge and asks you to step in. Your job is to look at the competing changes and decide what the final code should look like.
Why Conflicts Happen and How to Read Them
A conflict usually happens during a github pull and merge when changes you made locally overlap with changes that were pushed to the remote branch. Git will immediately stop the merge and mark the files that have issues.
When you open a conflicted file, you’ll find the problem area wrapped in special markers. These are your guide to fixing the problem:
<<<<<<< HEAD: This marks the start of the changes from your current branch. Think of this as your version.=======: This line is the divider. Everything above it is your code, and everything below it is from the branch you’re trying to merge in.>>>>>>> [branch-name]: This marks the end of the changes from the incoming branch.
Your task is to edit this entire block, remove all the <<<, ===, and >>> markers, and leave only the code you want to keep. Sometimes you’ll keep your version, sometimes you’ll take the incoming one, and other times you might have to manually write a new line that combines the logic from both.
Resolving Conflicts in VS Code
You can resolve conflicts using just the command line and a basic text editor, but a modern tool like VS Code makes the process much less painful. When VS Code detects a file with merge conflicts, it highlights the conflicting blocks and gives you a set of simple, clickable actions.
I can’t overstate how much easier a visual editor makes this. What used to feel like a stressful puzzle on the command line becomes a straightforward, side-by-side comparison where you can confidently pick the right code with a click.
Right above the conflicting code, you’ll see a few handy options:
- Accept Current Change: This keeps your code (the
HEADversion) and discards the incoming changes. - Accept Incoming Change: This does the opposite—it keeps the code from the other branch and discards yours.
- Accept Both Changes: This keeps both versions of the code, one after the other. Be careful with this one, as it can sometimes lead to duplicate or broken logic.
- Compare Changes: This opens a diff view, which is incredibly helpful for understanding complex conflicts side-by-side.
After you’ve gone through each conflict block in the file and made your choices, just save the file. The last two steps are to stage your newly resolved file (git add <file_name>) and then commit the changes (git commit). This tells Git that you’ve sorted everything out and it’s safe to finalize the merge. Sometimes, an AI assistant like GitHub Copilot can even suggest the right way to blend the conflicting logic.
Choosing the Right GitHub Merge Strategy
If you’ve ever managed a team project, you know that keeping your codebase clean isn’t just about the code itself—it’s also about how you tell its story. The way you merge a Pull Request has a massive impact on your project’s Git history. Picking a strategy and sticking to it is one of the most important decisions you’ll make for long-term maintainability.
On GitHub, you’re given three main ways to merge a PR, and each one writes a different kind of story.
Before we dive into those, it’s worth talking about merge conflicts. They can feel like a huge headache, but they usually stem from a simple cause: multiple people changing the same lines of code.
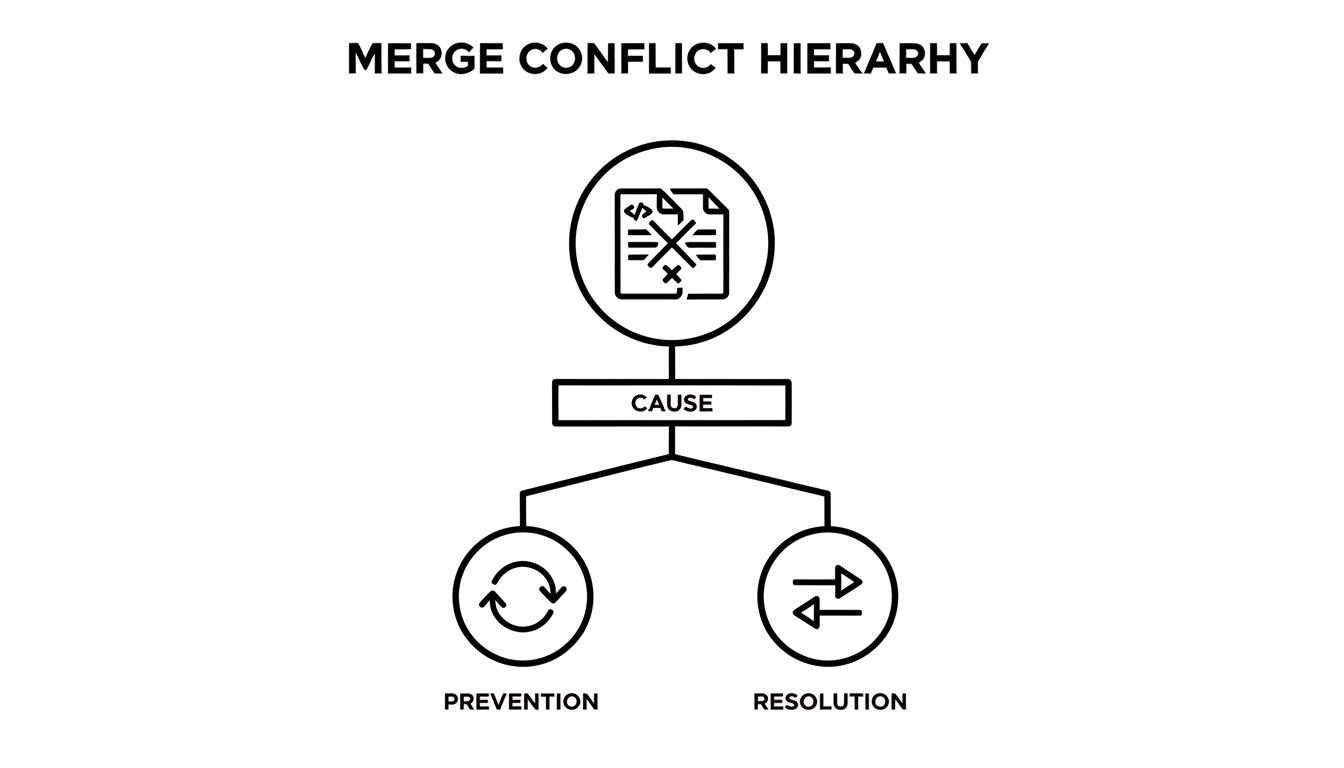
The real takeaway here is that preventing conflicts by frequently syncing your code is just as vital as knowing how to fix them. Your merge strategy plays a big part in how often—and how easily—you do this.
The Three GitHub Merge Strategies
When you’re ready to approve a PR and see that big green button, you get a choice. What you pick determines what your main branch’s history will look like. Let’s walk through the options.
GitHub Merge Strategies Compared
To help you decide, here’s a quick breakdown of how GitHub’s three primary merge strategies stack up against each other. Each one serves a different purpose, so the “best” one really depends on what your team values most: a detailed audit trail or a clean, simple timeline.
| Merge Strategy | Git History Result | Preserves | Best For |
|---|---|---|---|
| Create a merge commit | A non-linear history with a merge commit for every PR. | All original commits from the feature branch. | Large features or epics where individual commit history provides a valuable audit trail. |
| Squash and merge | A perfectly linear history where each PR becomes a single commit. | The context of the PR as a whole, but not individual commits. | Feature branches where intermediate commits (“fix typo,” “wip”) are not needed in the main history. |
| Rebase and merge | A linear history with each original commit added to the base branch. | Individual commits, but rewrites them onto the base branch. | Teams that demand a clean, linear history while still preserving the granularity of original commits. |
Ultimately, choosing a strategy is about balancing the need for a clean, readable history with the value of preserving the detailed, granular changes made during development.
Selecting Your Team’s Default
So, which one should you pick? In my experience, most teams find a sweet spot with Squash and Merge. It keeps the main branch history exceptionally clean—you get one single, tidy commit per feature. All the nitty-gritty “work-in-progress” commits are still available in the context of the closed PR if you ever need to dig them up, but they don’t pollute the primary log.
If you want to get really good at cleaning up your work before merging, you can learn more about how to do that in our guide to using Git rebase and squash.
On the flip side, some projects, especially in regulated industries, need a complete, unaltered audit trail. For them, Create a merge commit is the only way to go. It’s the most transparent method, showing the true, branching path of development, warts and all.
The most important thing is not which strategy you choose, but that you choose one and stick with it. Consistency is the key to a readable and maintainable project history.
Enforcing Merge Strategies with Branch Protection
Once your team has landed on a preferred strategy, the next step is to make it official. You can enforce your choice directly in GitHub using branch protection rules.
Just head to your repository’s “Settings,” click on “Branches,” and create a new protection rule for your main branch. From there, you can disable the merge options your team has decided against.
This simple piece of automation ensures every github pull and merge follows your team’s workflow without anyone having to play policeman. It’s a powerful way to build good habits. These kinds of automated workflows are becoming standard practice, and for good reason. As of 2024, GitHub Actions is already running over 5 million workflows daily, helping enterprises slash deployment times by 30%, while AI tools like GitHub Copilot (now used by over 20 million developers) are actively improving PR quality.
Common Sticking Points with GitHub Pull and Merge
No matter how long you’ve been using Git, a few common questions always seem to pop up during the pull and merge dance. Let’s clear up some of the most frequent points of confusion I see developers run into.
What’s the Real Difference Between git pull and git fetch?
This is easily the most common question, and getting it right is fundamental.
Think of git fetch as a reconnaissance mission. It goes out to the remote repository (like origin) and downloads all the latest changes, but it doesn’t touch your local work. It just updates your remote-tracking branches (e.g., origin/main), so you can safely inspect what your team has been up to without it affecting your code.
git pull, on the other hand, is the all-in-one command. It performs a git fetch in the background and then immediately tries to integrate those changes into your current branch using either a merge or a rebase.
My advice? Almost always fetch first. It’s a simple habit that gives you a crucial moment to look before you leap. You can review the incoming changes and decide how you want to integrate them, which saves you from so many surprise merge conflicts.
How Do I Undo a Pushed Merge on GitHub?
It happens to the best of us: you merge and push something you shouldn’t have. The golden rule here is to never use git reset on a shared branch. Rewriting history is a recipe for chaos and will create a massive headache for your teammates.
The clean, safe way to fix this is with git revert. This command doesn’t erase history; instead, it creates a brand new commit that does the exact opposite of the one you want to undo.
To revert a merge, you’ll need its commit hash (you can find it in your git log). Then, run this:
git revert -m 1 <merge-commit-hash>
The -m 1 flag is important—it tells Git which parent to keep as the “mainline,” which is usually your base branch (main or develop). Once you push this new revert commit, the problematic merge will be safely undone on GitHub for everyone.
Can I Merge a Pull Request with Conflicts on GitHub?
Nope. If your branch has conflicts with the target branch, GitHub will disable the “Merge pull request” button. It’ll be grayed out, and for good reason.
This is a critical safety feature to prevent you from breaking the main branch. You have to resolve the conflicts first. The standard workflow is to check out your feature branch locally, pull the latest changes from the base branch into it, and fix the conflicts on your machine. After you commit the resolved files and push them back up, the pull request will update automatically, showing that the conflicts are gone and the merge button is ready to go.
Master Your GitHub Workflow
Turning every code integration into a smooth process is what separates good teams from great ones. Here’s a quick rundown of what to track and what to practice.
📊 Core Metrics Worth Tracking
- Time to Merge: The average time from when a PR is opened until it’s merged. This is a great indicator of your team’s review speed.
- Merge Conflict Rate: How often do your PRs run into conflicts? A high rate points to friction in how your team syncs up.
- Review Time: How long does a PR sit before it gets its first review? If this number is high, you’ve found a key bottleneck.
🕹️ My Personal Cheat Sheet
- Fetch, Then Pull: I’ll say it again—always run
git fetchto see what’s coming before you integrate changes. - Choose the Right Merge Strategy: Use “Squash and Merge” for small feature branches to keep your
mainbranch history clean. For bigger, long-running features, a “Merge Commit” preserves the context of the work. - Write Great PR Descriptions: Give your reviewers everything they need: what the PR does, why it’s needed, and how to test it. Screenshots or GIFs are a huge help.
📈 Questions to Ask Yourself
- 💡 Am I syncing my branch with
mainoften enough to avoid massive, painful conflicts later? - 🧩 Is this merge strategy the best choice for our team’s workflow and how we want our Git history to look?
- 📘 Could I have split this work into smaller, more focused pull requests that would be easier and faster to review?
✅ Your Pre-Merge Checklist
- 🔍 Have I pulled the latest from the base branch and resolved any conflicts locally?
- 📊 Are all the CI checks and automated tests passing?
- 🧭 Is the PR title clear and the description helpful?
- 📈 Have I gotten the required approvals from my reviewers?
Master Your GitHub Workflow
Alright, we’ve gone through the nuts and bolts of Git commands and merge strategies. Now, let’s talk about how to put it all together into a smooth, repeatable process that helps your team ship code faster and with fewer headaches.
What to Measure for a Healthy Workflow
You can’t improve what you don’t measure. If you feel like your team’s code integration process is slow or clunky, these are the three numbers that will tell you exactly where the friction is.
-
Time to Merge: This is the big one. It measures the average time from when a Pull Request is opened until it’s merged. A long “time to merge” often points to slow review cycles or complex PRs.
-
Merge Conflict Rate: How often are you hitting merge conflicts? If this number is high, it’s a clear sign that your team isn’t syncing up often enough. It’s a direct measure of integration pain.
-
Review Time: This tracks how long a PR sits idle before someone leaves the first comment. It’s a classic bottleneck indicator—if PRs are waiting days for a first look, your whole development cycle slows to a crawl.
My Go-To Workflow Habits
Over the years, I’ve developed a few habits that have saved me countless hours of frustration. Think of these as my personal “cheat codes” for keeping my workflow clean and my history sane.
-
Look Before You Leap with
git fetch: I almost never rungit pullblindly. I start with agit fetchto download all the new changes from the remote without immediately trying to merge them. This lets me see exactly what’s coming down the pipeline before it messes with my local work. -
Be Deliberate with Your Merge Strategy: Don’t just click the big green button. Think about what you’re doing. I use Squash and Merge for most feature branches to keep the main branch history clean and linear—one commit per feature. For major integrations or merging a long-lived branch, I’ll use a Merge Commit to preserve the historical context of all the individual commits.
-
Write PR Descriptions for Humans: A good PR description is a gift to your reviewer. Give them the context they need: What problem does this solve? How did you test it? Add a screenshot or a GIF if it helps. A well-written PR gets reviewed and approved so much faster.
A Final Sanity Check Before You Merge
Ready to merge that PR? Just run through this quick mental checklist first. It’s the last line of defense against introducing bugs or creating confusion.
-
Is my branch up-to-date? I always pull the latest changes from the base branch (like
mainordevelop) into my feature branch and resolve any conflicts on my own machine before declaring it “ready.” -
Are the checks green? Don’t even think about merging if the CI tests are failing. A red checkmark is a hard stop.
-
Is the PR clear? Does the title and description make sense? Will a teammate looking at this in six months understand what you did and why?
-
Do I have the green light? Make sure you’ve gotten the required number of approvals from your team. Respect the review process.
Level Up Your Merge Game
Put these principles into practice to ship code faster and with fewer headaches.
📊 Core Metrics
- Time to Merge — How long a PR stays open, from creation to merge.
- Merge Conflict Rate — Frequency of conflicts encountered in PRs.
- Code Review Velocity — Average time a PR waits for its first review.
🕹️ My Cheatcodes
- 🌱 Fetch First, Merge Second — Always inspect remote changes with
git fetchbefore integrating. - 🦎 Right Merge for the Job — Use "Squash and Merge" for features, "Merge Commit" for epics.
- ⚡ PRs are READMEs — A clear title, "why," and testing steps make reviews 10x faster.
✅ Before Merging
- 🔍 Sync with base branch and resolve conflicts locally first.
- 📊 Ensure all CI checks and automated tests are green.
- 🧭 Confirm PR title and description are clear and useful.
- 📈 Verify all required approvals are in place.
Gallery
Lemon shots



