Cursor AI Tutorial: Master Techniques with cursor ai tutorial for Faster Coding

Let’s be honest, trying to bolt an AI assistant onto your regular editor can feel clunky. It often seems like the AI just doesn’t get the full picture of your project. This is where Cursor changes the game. Think of it less as an editor with an AI plugin and more as a development environment built from the ground up for AI collaboration.
What Is Cursor and Why You Should Care

Cursor is built on the same foundation as VS Code, so it feels instantly familiar. The crucial difference, though, is that artificial intelligence isn’t an add-on; it’s woven into the very fabric of the editor.
This deep integration means the AI has the full context of your codebase. It can see the connections between files, understand your project’s architecture, and offer suggestions that are actually relevant. It’s the difference between asking a stranger for directions and having a co-pilot who already knows the map.
More Than Just a Chatbot in Your Editor
If you’re thinking “it’s just VS Code with a chatbot,” you’re missing the real magic. A simple extension can’t do what Cursor does because the power is in its codebase-aware features.
- It understands the whole picture. Cursor can reference other files, pull from your documentation, and even look at terminal output to give you better answers and generate more accurate code.
- It helps without you asking. The AI doesn’t just sit there waiting for a prompt. It actively helps you find bugs, suggests smart ways to refactor your code, and can even build out entire features from a simple description.
- It makes onboarding a breeze. Ever jump into a massive, unfamiliar repository? With Cursor, you can just ask it to explain how things work, which cuts down your ramp-up time from days to hours.
This AI-first approach is why it took off so quickly. Cursor hit about 1.0 million total users within 16 months of launching and has a paid-conversion rate of nearly 36%—a number that’s almost unheard of for developer tools. If you’re curious about these trends, opsera.ai has a great write-up on what this means for the future of coding.
To give you a quick overview, here’s a look at what Cursor brings to the table.
Cursor AI Core Capabilities at a Glance
| Feature | Primary Use Case | Benefit |
|---|---|---|
| Codebase-Aware Chat | Asking questions about your entire project, not just a single file. | Get highly relevant answers and code suggestions that respect your project’s architecture. |
| “With Codebase” Context | Tagging specific files or docs (@) to focus the AI’s attention. | Precision control for generating code, writing tests, or creating documentation. |
| Inline Edit/Generate | Highlighting code and prompting the AI to refactor, fix, or add to it. | Make targeted changes instantly without leaving your workflow. |
| AI-Powered Linting | Automatically identifying and fixing bugs, style issues, and vulnerabilities. | Improve code quality and catch errors before they become problems. |
| “Chat with Docs” | Pointing the AI to external documentation (MDN, React, etc.) for answers. | Get accurate, up-to-date information without constantly switching to a browser. |
This table just scratches the surface, but it highlights how each feature is designed to integrate AI into your natural coding process.
At its heart, Cursor is designed to reduce the cognitive load on developers. It handles the tedious, repetitive tasks, freeing you up to focus on solving complex problems and building great software.
What This Means for You
So, what does this actually look like day-to-day? It means you’ll spend less time hunting down bugs because the AI can trace errors across multiple files for you. It means you’ll write better, more robust code because the AI is right there to help you write tests and spot edge cases you might have missed.
The reason to care about Cursor is simple: it’s a shift from just writing code in an editor to collaborating with an intelligent system that makes you a better, faster developer. This guide will walk you through exactly how to tap into that power.
Your First Ten Minutes with Cursor

Jumping into a new tool often feels like a hassle, but getting started with Cursor is surprisingly quick. Since it’s built on top of VS Code, it’s designed to feel comfortable right out of the box. Let’s walk through getting you from download to a fully configured, AI-powered setup in just a few minutes.
First things first, head over to the Cursor website and download the version for your system—macOS, Windows, or Linux. The installation is pretty standard. The real magic happens when you launch it for the first time.
Seamlessly Import Your VS Code Environment
One of the smartest things Cursor does is offer a one-click import from VS Code. If you’re coming from VS Code, a prompt will pop up asking if you want to bring everything over. Say yes. This pulls in all your settings, themes, keybindings, and extensions.
Honestly, this is a huge time-saver. You won’t have to waste an hour reinstalling your favorite extensions or trying to remember the hex code for your theme. Your entire curated workspace gets cloned, so all your muscle memory still works. You can jump straight into the AI features instead of fumbling with a new editor.
Pro Tip: Don’t skip the VS Code import. It’s the fastest way to make Cursor feel like your editor. You can always fine-tune things later, but this single step makes the transition feel almost nonexistent.
Of course, if you’re not a VS Code user or just want to start fresh, that’s fine too. Just skip the import and you’ll get a clean, default setup.
Configuring Your AI and Account Connections
After your editor settings are sorted, Cursor will walk you through connecting your accounts and picking your AI models. This is where you plug in the editor’s brain.
You’ll be asked to log in first. You’ll need an account to manage your plan and keep track of AI usage. The easiest route is signing in with your GitHub account—it’s quick and pretty standard for developer tools.
Next up is choosing your AI engine. This is a key step because it defines which “mind” you’ll be working with. You have a couple of options here:
- Default Models: Cursor comes with built-in access to powerful models like GPT-4o and Claude 3 Opus. Your access to these depends on which plan you’re on—Free, Pro, or Business.
- Bring Your Own Key: If you already have an API key from a provider like OpenAI or Anthropic, you can plug it right in. This is a great choice if you have existing credits or just want more control over your API costs.
Once you’ve made your choice, that’s it. You’re ready to start coding. The whole thing—from download to a fully authenticated, personalized editor with AI ready to go—really does take less than ten minutes. Your extensions are loaded, your theme looks right, and you’re ready to give the AI its first command.
Weaving AI into Your Daily Coding Rhythm
Alright, you’ve got Cursor installed and set up. Now for the fun part: making it an actual part of how you code, day in and day out. The goal here is to move past seeing it as a separate tool and start treating it like a natural extension of your own mind—something you reach for instinctively, just like a keyboard shortcut.
You’ll know you’re getting there when you stop thinking, “Oh right, I have an AI I can ask,” and instead, your first impulse when facing a tricky problem is to collaborate with it.
Your Go-To Command for Everything: Inline Chat
The single most important feature to bake into your muscle memory is the inline chat, fired up with Cmd/Ctrl+K. Seriously, this command will become your new best friend. It lets you generate, refactor, and ask questions about code right where you’re working, so you never have to break your flow by switching to a different window.
Think of it as having a pair programmer on speed dial. Just highlight a chunk of code, hit Cmd/Ctrl+K, and tell it what you need.
- “Turn this into a reusable React hook.”
- “Add JSDoc comments to this function explaining what it does and what the parameters are.”
- “Can you convert this
forloop into a more modern.map()function?”
Cursor will pop up a diff view showing the proposed changes. You can accept, reject, or even ask for a different version, all without leaving your editor. This seamless back-and-forth is what makes it so powerful—it keeps you locked in and focused.
The magic of inline chat is how immediate it is. It completely removes the friction. A complex refactor that might have taken ten minutes of careful manual editing suddenly becomes a ten-second conversation with your AI assistant.
Putting It to Work: Real-World Scenarios
Let’s get practical. Theory is one thing, but seeing how this works on everyday tasks is another. Here are a couple of situations where Cursor can give you a serious speed boost.
Scenario 1: Generating a Complex Function from a Simple Comment
Instead of building out a new function from scratch, just write down what you want it to do in a comment. Let Cursor handle the boilerplate.
// Create a function called ‘fetchUserData’ that takes a ‘userId’ // It should make an async GET request to ‘/api/users/{userId}’ // Make sure to handle potential errors with a try-catch block // If the request works, return the user data as a JSON object // If it fails, log the error and just return null
Once you’ve written that, just highlight the comment, press Cmd/Ctrl+K, and type something simple like “generate this.” Cursor will instantly translate your plain English into working code, complete with the async/await logic and error handling you asked for.
Scenario 2: Finding and Squashing Bugs in a Selection
We’ve all been there—staring at a block of code that should work but doesn’t. Before you start littering it with console.log statements, try highlighting the suspicious part.
Press Cmd/Ctrl+K and ask, “Find potential bugs in this code.”
You’ll be surprised at how good it is at spotting things like off-by-one errors, unhandled nulls, or inefficient loops. It doesn’t just flag the problem; it gives you a direct fix you can apply instantly. Debugging goes from a frustrating hunt to a quick, targeted repair.
Using “Fix & Diff” for Pesky Linter Errors
Nothing kills momentum like a screen full of red squigglies from your linter. This is exactly what Cursor’s Fix & Diff feature was built for. When you hover over a linter error, you’ll often get an AI-powered suggestion to fix it.
A single click is all it takes to apply the change. This is a game-changer for:
- Instantly fixing formatting issues to match your team’s Prettier or ESLint rules.
- Resolving TypeScript type errors by adding the right type annotations.
- Simplifying code that’s getting flagged for being too complex.
By making it trivial to handle these small but constant interruptions, you maintain a cleaner codebase and stay focused on solving the real problems. Building these small habits is a massive part of improving developer productivity with AI tools, because all that time saved on tiny fixes really adds up.
From Cool Trick to Essential Tool
Getting AI into your daily workflow happens one small step at a time. Don’t try to boil the ocean. Start by using Cmd/Ctrl+K for a simple utility function. Ask it to add comments to a function you just wrote. Use Fix & Diff for every linter warning you see.
As you get comfortable, you’ll find yourself naturally using it for bigger things. Before you know it, asking Cursor to “write the unit tests for this component” or “refactor this class to use the composition pattern” will feel just as normal as writing a for loop yourself. That’s when you know it’s no longer a novelty—it’s an indispensable part of how you build software.
Unlocking Advanced Productivity with Smart Workflows
Once you get the hang of the basic commands, you’ll find they become second nature. That’s when you’re ready to dig into the workflows that really make a difference. This is where you graduate from asking simple, one-off questions to truly collaborating with the AI on complex features and architectural decisions.
The secret isn’t about memorizing more commands. It’s about shifting your mindset. You need to start thinking of the AI less like a tool and more like a junior developer who’s incredibly fast but needs clear, contextual guidance to do its best work. And in any good cursor ai tutorial, context is king.
Leveraging the Power of Context with ‘@’ Commands
The single most important feature for giving the AI that guidance is the @ symbol. Think of it as telling the AI, “Hey, look over here.” Instead of letting it guess by scanning your entire project, you can point it to the exact files, documentation, or even terminal output it needs to give you a spot-on answer.
Here are a few ways I use this every day:
@filefor Specific File Context: When I need to build a new component that should look and feel like an existing one, I reference it directly. A prompt like, “Create a newUserProfileCardcomponent that follows the same pattern and styling as@components/UserAvatar.tsx,” gives the AI a perfect blueprint. No more inconsistent code.@docsfor External Knowledge: You can point Cursor to official documentation to make sure it’s using the latest APIs or coding standards. I’ll often use something like, “Refactor this function to use the new suspense features outlined in the@reactdocs.” It saves me from having to switch tabs and look it up myself.@terminalfor Real-Time Debugging: This one’s a lifesaver. When an error pops up, you can reference the terminal output right in your chat. For example: “Based on the error in@terminal, what’s wrong with my database connection string in@config/db.ts?” The AI can connect the dots between the error message and the code to find the problem much faster.
This approach—providing sharp, specific context—is the heart of an effective AI-assisted coding process. It’s a simple, iterative loop that you’ll find yourself running through constantly.
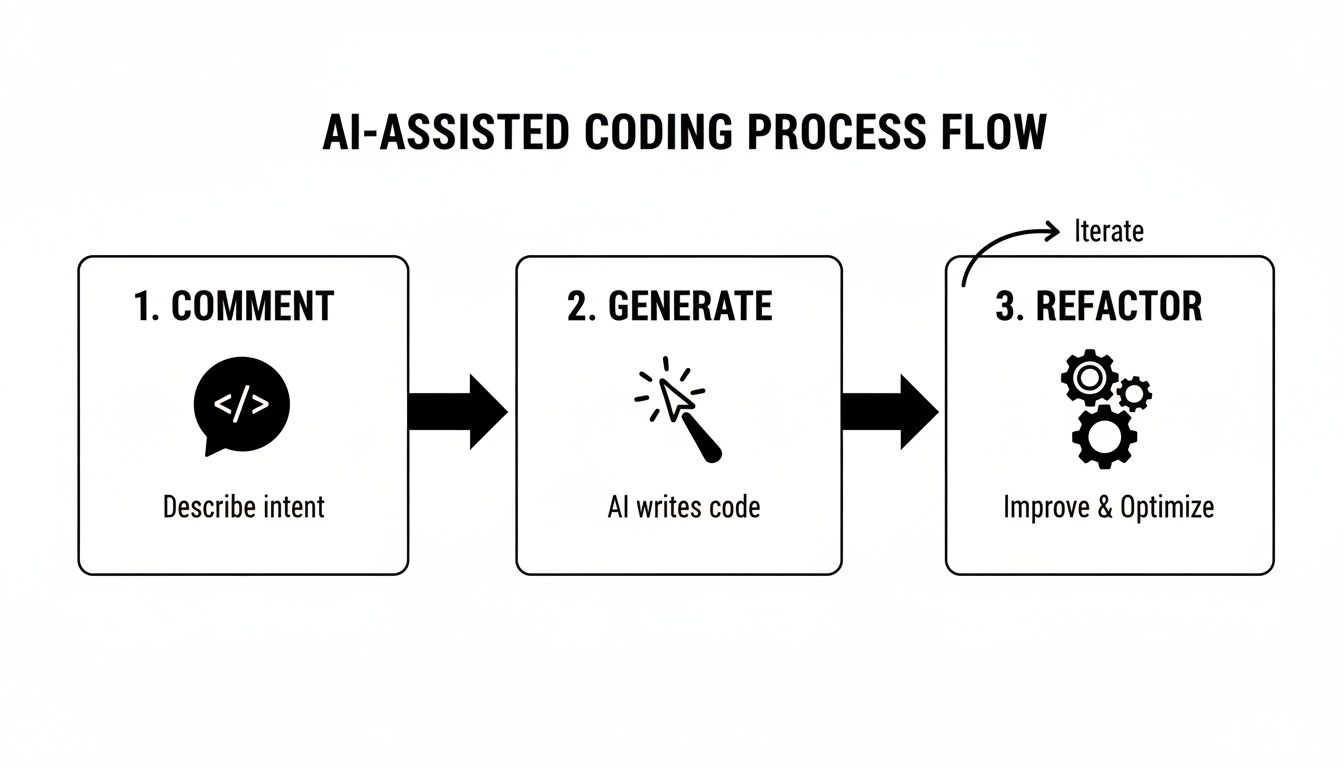
This workflow feels incredibly natural once you start using it. You state your intent, the AI provides a draft, and then you work together to refine it. This collaborative rhythm is what really speeds things up.
Chaining Prompts for Complex Feature Development
When you’re tackling something big, don’t throw a giant, convoluted prompt at the AI and hope for the best. You’ll just get a mess. Instead, break the problem down and chain your requests together, just like you would if you were pair programming with a colleague.
Let’s say you’re building a new settings page. Your workflow might look something like this:
- First Prompt: “Create a new file
src/pages/Settings.tsx. Scaffold a basic React component with a main heading ‘User Settings’ and an empty form.” - Second Prompt: “Okay, inside that form, add three input fields: one for ‘Username’, one for ‘Email’, and a password field. Use the
@components/Input.tsxcomponent for each one.” - Third Prompt: “Great. Now, add a ‘Save Changes’ button under the inputs. When it’s clicked, it should call a function named
handleSave.” - Final Prompt: “Finally, write the
handleSavefunction. It needs to pull the data from the form into a state object and then make aPOSTrequest to the/api/settingsendpoint.”
By breaking the task into smaller, manageable chunks, you guide the AI through the process. This lets you sanity-check each piece before moving on, making it far more reliable for building out complex features.
For anyone interested in the broader principles behind this approach, there are plenty of great resources on improving workflow efficiency and boosting productivity that apply well beyond just coding.
Enforcing Standards with Custom AI Rules
Now for one of my favorite advanced features: the .cursorrules file. You can create this file in your project’s root directory to give the AI a permanent set of instructions. It’s like a style guide that the AI has to follow, ensuring it always sticks to your team’s specific coding standards.
Your .cursorrules file can contain instructions like:
- “Always use functional components with TypeScript and React Hooks. Do not use class components.”
- “Never write code that directly manipulates the DOM. All UI changes must be driven by React state and props.”
- “All API calls must be defined in the
@/utils/api.tsfile.” - “For state management, only use Zustand. Do not add Redux or other state management libraries.”
You don’t need a comprehensive list to start. Just begin with a few key rules and add more as you notice the AI going off-script. Over time, this teaches the AI your project’s unique “dialect,” leading to much more consistent and high-quality code. This level of customization also opens the door to powerful integrations; for a great example, see our guide on how to use Cursor with Figma and GitHub for a more connected workflow.
Mastering these workflows—providing deep context, chaining your prompts, and setting custom rules—is what elevates Cursor from a handy code generator to a genuine development partner.
Cursor Prompting Strategies Comparison
To really see the difference, let’s compare a basic approach with a more advanced, context-aware one. The quality of your input directly impacts the quality of the output.
| Technique | Basic Prompt Example | Advanced Prompt Example | Outcome |
|---|---|---|---|
| Component Creation | “Make a button component.” | “Create a React button component in a new file named Button.tsx. It should accept a variant prop (‘primary’ or ‘secondary’) and follow the styling of @components/Input.tsx.” |
The advanced prompt produces a component that is correctly styled, typed, and placed within the project structure, saving significant refactoring time. |
| Bug Fixing | “My code is broken, fix it.” | “I’m getting a ‘cannot read properties of undefined’ error in the console, traced to line 25 of @components/DataGrid.tsx. The error seems to happen when the users prop is empty. Fix it.” |
Instead of guessing, the AI can pinpoint the exact line of code and the specific condition causing the error, leading to a much faster and more accurate fix. |
| Refactoring | “Make this function better.” | “Refactor this fetchUserData function in @utils/api.ts. Use the async/await syntax and implement error handling with a try...catch block, logging any errors to the console.” |
The advanced prompt provides clear, actionable instructions, resulting in code that not only works but also adheres to modern best practices and project standards. |
As you can see, a little extra effort in your prompting pays off big time. Being specific and providing context is the fastest way to get the AI to generate code you can actually use.
Navigating Cursor Plans and AI Models

Picking the right plan for any tool can feel like a chore. With Cursor, it really just comes down to one question: how heavily will you rely on the best AI models for your day-to-day coding? Getting a handle on their plans is the first step to making a smart choice that actually fits how you work.
Cursor keeps things simple with a few tiers: a Free plan for trying it out, a Pro plan for individual developers, and a Business plan for teams. The main difference isn’t about holding features hostage—it’s all about how much access you get to the most powerful AI models on the market.
Fast vs. Slow Requests: What Really Matters
The entire pricing structure hinges on “fast” and “slow” AI requests. This is probably the most important concept to grasp because it directly affects how fast and effective your workflow will be.
-
Fast Requests: Think of these as your express lane. They tap into the most advanced models available, like GPT-4o or Claude 3 Opus. You get high-quality, nearly instant code suggestions, which is exactly what you need for complex tasks like refactoring an old module or debugging a tricky issue. The Pro and Business plans give you a big bucket of these each month.
-
Slow Requests: This is the default lane. On the Free plan, once you burn through your fast requests, you’re moved here. The AI still helps, but you’ll feel the difference—responses are noticeably slower, and the suggestions might not be as sharp or insightful.
The real benefit of paying for Cursor is having consistent, high-speed access to the best AI models. For any professional developer, the time you save by not waiting on a slower, less capable model can easily pay for the subscription in just a few days of serious work.
Breaking Down the Plans
For most individual developers, the choice is between the Free and Pro plans. The Free plan is perfect for getting your feet wet and seeing how AI-assisted coding feels. But if you’re a serious developer, you’ll likely hit the fast request limit and find it becomes a bottleneck.
The Pro plan is built for daily, professional use. It gives you enough fast requests to lean on the top models all day without constantly checking your usage. Cursor’s Pro plan typically runs around $20 per month for individuals. For true power users, there are even higher tiers—an “Ultra” plan has been seen at about $200/month, offering something like 20x the usage.
Is Bringing Your Own API Key a Good Idea?
Cursor gives you the option to plug in your own API keys from services like OpenAI or Anthropic. This can be a smart move, but only in specific situations:
- You already have a bunch of API credits from another project.
- Your coding is sporadic, making a pay-as-you-go model cheaper than a monthly fee.
- You need to use a very specific model version that isn’t prioritized in Cursor’s plans.
For most developers with a steady workflow, the Pro plan’s included requests usually offer better value and a more predictable monthly bill. If you’re looking to get really advanced with model performance and cost, learning how to train ChatGPT on your own data can offer a deeper understanding of how these models work. This knowledge can help you decide whether a subscription or your own API key makes more sense for you in the long run.
Common Problems and How to Fix Them
Even the slickest tools hit a snag now and then. When your flow gets interrupted, it’s frustrating. Think of this as your go-to guide for the common hiccups you might run into with Cursor AI. We’ll walk through some practical fixes to get you back to coding in no time.
One of the first things people notice is an extension not playing nice. Because Cursor is built on the VS Code foundation, it can use that massive library of extensions. But every once in a while, one of them will clash with Cursor’s built-in AI.
If you suspect an extension is causing trouble, the first thing to do is just turn it off. Disable it, restart Cursor, and see if the problem goes away. If it does, you’ve found your culprit. From there, you can check for an update to the extension or start looking for a replacement.
Resetting a Confused AI
Have you ever had the AI get stuck on a past conversation or completely miss the context of the file you’re in? It happens. The AI can sometimes hold onto stale information, which leads to some truly bizarre and unhelpful suggestions.
Thankfully, the fix is super simple. You just need to force Cursor to get a fresh look at your code. You can use the “Clear Chat History” command or, even easier, just close and reopen the file. This gives the AI a clean slate, making it re-index the file and provide much more relevant help.
A confused AI is usually just a symptom of stale context. Don’t hesitate to reset the conversation. It’s the digital version of telling your pair programmer, “Okay, let’s take a fresh look at this from the top.”
Resolving API Key and Response Issues
Another common hurdle is getting painfully slow AI responses or outright connection errors. This is especially true if you’re bringing your own API key to the party. These issues almost always come down to one of a few things.
- Double-Check Your API Key: Go into Cursor’s settings and make sure your key is entered perfectly. A single typo is all it takes to break the connection to OpenAI or Anthropic.
- Look at Your API Quotas: It’s easy to burn through your credits when you’re in the zone. Log into your API provider’s dashboard and check that you haven’t hit your usage limits. Also, make sure your billing info is current.
- Test Your Network: Sometimes, the problem has nothing to do with Cursor. Before you go down a rabbit hole, do a quick check on your internet connection. A firewall or spotty Wi-Fi could easily be the real cause.
If you want to get better at diagnosing these kinds of logic problems, exploring techniques for AI-driven code debugging can give you a solid framework that applies here, too.
Finally, don’t underestimate the community. The official Cursor Discord server is packed with other developers and members of the Cursor team. If you’re really stuck, it’s a safe bet someone there has already solved the exact same problem.
Your Questions About Cursor Answered
It’s natural to have a few questions, even after a walkthrough. Let’s tackle some of the most common things developers ask me about Cursor to clear up any confusion.
Is Cursor Just VS Code with a Chatbot?
Not at all. Think of it this way: while Cursor is built on the VS Code open-source editor (which is great for familiarity), it’s fundamentally an “AI-first” environment. The AI isn’t just a bolt-on chat window; it’s woven into the fabric of the editor itself.
A typical VS Code extension might look at the file you have open. Cursor, on the other hand, is built to understand your entire project—how all the different files connect and interact. That deep, codebase-wide context is what allows it to give you incredibly relevant help, from generating code to hunting down bugs, in a way a simple chatbot plugin never could.
Can I Use My Own API Keys?
Yep, absolutely. You can plug your own API keys from providers like OpenAI or Anthropic right into the settings. This is a popular move for a few good reasons:
- Cost Control: If you’re not coding with AI 24/7, a pay-as-you-go model with your own key can be way cheaper than a monthly subscription.
- Existing Credits: Already have API credits from another project? You can put them to use here.
- Model Access: It lets you tap into specific models that might not be available by default in Cursor’s standard plans.
It’s all about giving you more control over what you use and what you spend.
How Does Cursor Handle Code Privacy?
This is a big one, and rightly so. Cursor is very clear that your code is never used to train their models. That’s a huge distinction from many other AI tools out there and is crucial for protecting your work.
If you’re on a paid plan, you can also flip on “Privacy Mode.” This setting further limits the data sent to the underlying AI models, adding another layer of security for sensitive projects. As always, it’s a smart idea to give their latest privacy policy a once-over for the full details on how they handle your data.
What Happens When I Run Out of Fast Credits?
You’re not left in the dark. Once you burn through your monthly allotment of fast requests (the ones that use powerful models like GPT-4o), Cursor just switches you over to its slower, less advanced models.
You’ll still be able to get help, but the answers will take longer and might not be as sharp. Your fast credits will reset at the start of your next billing cycle, getting you back in the fast lane with the top-tier AI.
Level Up Your Cursor Workflow
Turn every coding session into a learning loop with smarter, context-aware AI collaboration.
📊 Core Metrics
- Code Generation Accuracy — Percentage of AI-generated code accepted without major edits.
- Context-Aware Prompts — Number of times `@file` or `@docs` were used to improve AI focus.
- Time-to-Debug — How quickly you resolved bugs using AI suggestions vs. manual methods.
🕹️ My Cheatcodes
- 🌱 Chain Your Prompts — Break down a large task into smaller, sequential requests for better control and accuracy.
- 🦎 Reference Existing Code — Use `@file` to show the AI a good example of a pattern you want it to follow, ensuring consistency.
- ⚡ Define Global Rules — Set up a
.cursorrulesfile to teach the AI your project's specific coding standards from the start.
📈 Reflection Points
- 💡 Did I provide enough context in my prompts, or did I force the AI to guess my intent?
- 🧩 Could I have used inline chat (`Cmd+K`) to refactor that complex function instead of doing it manually?
- 📘 Am I blindly accepting AI suggestions, or am I reviewing and understanding the changes?
Gallery
Lemon shots